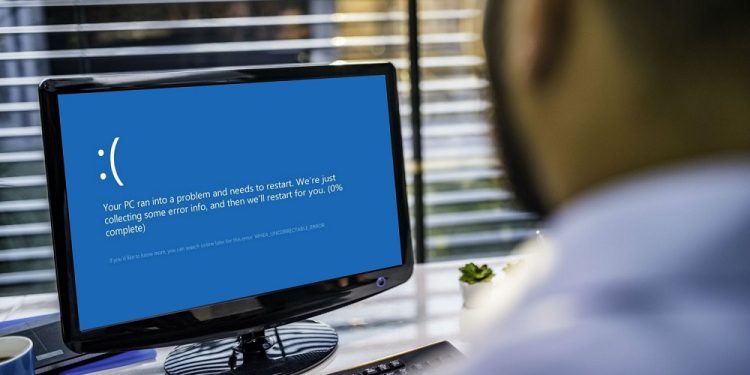
When your BIOS settings are incorrectly set up, or there is a component failure on your system, the WHEA UNCORRECTABLE ERROR (Windows Hardware Error Architecture) appears. Though the majority of the time, the issue is hardware-based, it is still advisable to ensure that everything is okay on the software side; dealing with software-based issues is considerably simpler and may be done without expert assistance.
You can discover the specific location of the issue and how to address it by using the solutions mentioned in this tutorial. Furthermore, if your computer is incorrectly raising the flag due to a software problem, the solutions will fix it. However, because there might be several causes for this issue, you may need to apply the fixes indicated below to fully remove it from your PC. But, before you begin correcting the issue with this advice, you must first understand why it happens.
Why Does WHEA UNCORRECTABLE ERROR Occur?
The WHEA UNCORRECTABLE ERROR is a significant error that can crash your system and reset itself if not rectified in time. It’s a frequent blue screen error that shows when your computer shuts down to prevent data loss. However, the error may erode your files and folders from the PC while resetting itself.
Though most of the time, this error is caused by faulty hardware on the system; it has been noticed that driver incompatibilities, obsolete Windows versions may also cause it, and even CPU overclocking. Furthermore, a malfunctioning hard drive, poor memory, an improperly installed CPU, or several other hardware defects may cause a WHEA UNCORRECTABLE ERROR.
Note: Overclocking the CPU may also cause this error, and if you have recently experienced the error after overclocking, reversing the operation will repair the problem instantly.
WHEA UNCORRECTABLE ERROR In Windows 11? How To Fix
Check Bad Sectors On Hard Drive
The first and most important fix you may attempt is to use the CHKDSK command to inspect and repair the faulty sectors on your hard disk. It is easy, quick, and only needs a little of your involvement. Furthermore, the CHKDSK command may be launched from both File Explorer and the Command Prompt. Finally, use the Command Prompt to give yourself additional control over the chkdsk command.
1 – To use File Explorer to perform the CHKDSK command, double-click on the ‘This PC’ icon on your desktop. Alternatively, you may access it by using the Windows+E keyboard shortcut.
2 – Right-click on the drive you want to inspect, then choose the ‘Properties’ option from the context menu.
3 – On the ‘Windows Properties’ window, click the ‘Tools’ tab, then the ‘Check’ button in the ‘Error Checking’ section.
4 – If there are no errors on the driver, the system may request you to confirm this. If you still want to scan the drive, choose the ‘Scan drive’ option from the window. Otherwise, click the ‘Cancel’ button.
5 – The scan may take some time. Allow the procedure to run in the background while you wait. While the scan is running, but not while fixing it, you can use the disk. If any errors are discovered after the scan, you may choose whether or not to fix them.
If no errors are found, proceed to the next fix.
Run Windows Memory Diagnostics
You can detect and locate RAM issues with the assistance of Windows Memory Diagnostics. The issue is almost certainly related to a hardware problem, as was previously stated. This will assist you in determining whether the issue is caused by malfunctioning RAM.
1 – Navigate to the Start Menu and enter Memory Diagnostics to find it. Then, choose the ‘Windows Memory Diagnostics’ tile from the search results.
2 – To continue, click the ‘Restart now and check for problems’ tile on the ‘Windows Memory Diagnostic’ window. This will instantly restart your computer and examine the installed RAM for any errors that may have occurred during the PC startup process.
Uninstall Recently Installed Update
Uninstalling the update from your system may help if you’ve been having the issue after recently installing it. You can delete an update from your Windows 11 PC’s Settings app.
1 – To revert to an earlier operating system version, go to the Start Menu and choose the ‘Settings’ tile to enter the Settings window. Alternatively, put Settings into the menu to find it.
2 – On the Settings window, click the ‘Windows Update’ option on the left sidebar.
3 – Next, from the right side of the window, find and click the ‘Update history’ tile, which is located under the ‘More options’ area.
4 – Scroll down to the bottom of the Windows history page and click the ‘Uninstall updates’ tile under the ‘Related settings’ section.
5 – Select the most recently installed update on the next page and click the ‘Uninstall’ option to proceed. This will display an overlay window over the page.
6 – Select the ‘Uninstall’ option from the overlay window to begin the update rollback.
Your system will restart after the rollback is complete. If it does not, you must restart it manually. Check to see whether the error has been addressed when it resumes.
Update Or Install Missing Drivers
One of the reasons you’ve been having this issue on your system might be a missing or outdated driver. It is worth a go since upgrading and/or installing a driver on your system is simple. Furthermore, you may upgrade the driver using the Settings app or the Device Manager.
1 – To install or update the driver via the Settings app, go to the Start Menu and choose the ‘Settings’ icon tile from the ‘Pinned apps’ area. Alternatively, you may access the app by pressing the Windows+I keys simultaneously on your keyboard.
2 – On the Settings window, click the ‘Windows Update’ option on the left sidebar.
3 – From the right side of the window, click the ‘Advanced options’ tile, which is located under the ‘More options’ area.
4 – On the following screen, scroll down and click the ‘Optional updates’ tile, which is located under the ‘Additional options’ area.
5 – Locate and click the ‘Driver updates’ tile to enlarge it. Then, from the list of available drivers, find the available driver and choose it by clicking the checkbox next to the specific item. Then, at the bottom of the section, click the ‘Download & install’ option to begin the driver installation.
You may also use the Device Manager to install the missing drivers. Again, the procedure is rather simple. Furthermore, using the Device Manager is easier if you need to install or update many drivers on your system.
1 – Go to the Start Menu and enter Device Manager into the search bar to find it. Then, choose the ‘Device Manager’ tile from the search results to launch the app.
Note: We will upgrade the ‘Bluetooth’ drivers to demonstrate the procedure. You may repeat this procedure for any additional drivers mentioned in Device Manager.
2 – Find and click the downward arrow preceding the ‘Bluetooth’ category in the ‘Device Manager’ window. Then, choose the ‘Intel Wireless Bluetooth’ driver among the expanded options and right-click it to open the context menu. To continue, choose the ‘Properties’ option. This will launch a new window on your screen.
3 – In a separate window, you can examine the driver’s current status for the hardware on your PC. If no driver is found, the window will indicate this. Then, click the ‘Update driver’ button under the ‘Device status’ box. If you are here to update an already installed driver, choose the ‘Driver’ option at the top of the window. Then, in the window, click the ‘Update driver’ option to begin. This will launch a new window on your screen.
4 – In the newly created window, choose the ‘Search automatically for drivers’ option to instruct Windows to look for the most recent driver available on Microsoft servers.
5 – To continue, if you already have a driver update package, choose the ‘Browse my computer for drivers’ option. This will launch a File Explorer window on your screen, allowing you to pick up the driver package to update.
If the update/install was successful, you might need to restart your computer to effect the changes. It may be restarted from the Start menu.
Disable External Audio Devices
By disconnecting the externally attached audio device from their system, some customers have been able to remedy the issue. Though this fix is a little unusual, it is worth a go.
1 – To proceed, go to the Start Menu and choose the ‘Settings’ tile from the ‘Pinned apps’ area. You can press the Windows+I keys together on your keyboard.
2 – Next, in the Settings window, ensure you’ve chosen the ‘System’ option on the left sidebar.
3 – To continue, find and click the ‘Sound’ tile in the right area of the window.
4 – Scroll to the bottom of the page and click the ‘More sound settings’ tile, which is located under the ‘Advanced’ section. This will launch a new window on your screen.
5 – To proceed, right-click on the non-default listing for playback in the ‘Sound’ window and choose the ‘Disable’ option. If your system has more than one non-default listing, repeat the procedure for all of them.
Reset PC
The final step is to reboot your PC if no other approach has been able to fix the issue. Fortunately, you will not lose your personal files and folders; restarting your PC will erase all installed programs and restore all settings to their defaults.
1 – To reset your PC, go to the Start Menu and choose the ‘Settings’ tile from the ‘Pinned apps’ area. Alternatively, to run a search put Settings into the search field.
2 – Next, in the Settings window, ensure the ‘System’ option is chosen on the left sidebar.
3 – Scroll down to the right part of the window and click the ‘Recovery’ tile.
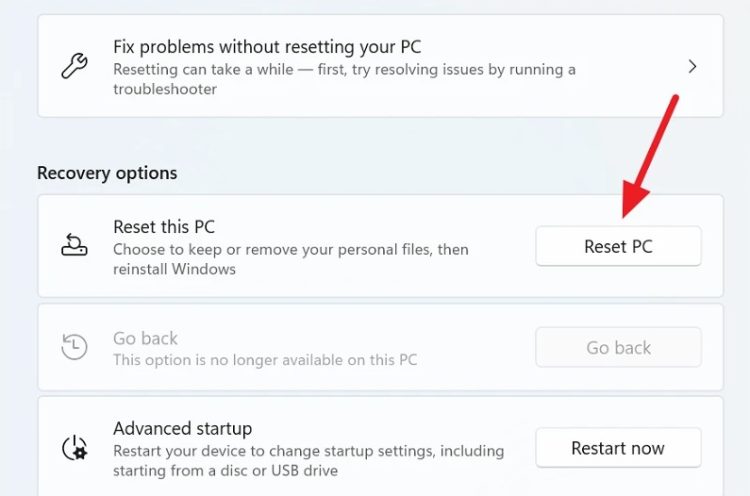
4 – Select the ‘Reset this PC’ tile on the ‘Recovery’ settings screen and click the ‘Reset PC’ button on the far right side of the tile. This will launch a new window on your screen.
5 – Click the ‘Keep my files’ tile in the newly opened window. If you want to erase your files while resetting, use the ‘Remove everything’ option.
6 – On the next page, choose a method for reinstalling the operating system on your computer. You should choose the ‘Cloud download’ option since there may be an issue with the copy existing on your system.
Note: ‘Could download’ will demand an active internet connection and will take up to 4 GB of bandwidth.
7 – Windows will then display a list of the options you have selected. If you want to alter anything, use the ‘Change settings’ option.
8 – If you opted to alter the settings, you may choose not to restore the apps and settings on the following page by tapping on the toggle switch located beneath the ‘Restore preinstalled apps?’ option to change it to a ‘No’ stance. You may also switch from Cloud download to local installation by clicking the toggle button located beneath the ‘Download Windows?’ section.’ option for changing the installation procedure. Once you’ve made your changes, click the ‘Confirm’ button to continue.
9 – Click the ‘Next’ option to proceed from the main window.
10 – If your PC was recently updated, you will see a notification on the screen saying that you cannot roll back after you reset the PC. To proceed, click the ‘Next’ button. After that, Windows will list all the effects restarting your PC will have on your system. Read them carefully before clicking the ‘Reset’ button to begin the reset procedure.
Conclusion:
The WHEA UNCORRECTABLE ERROR is a serious error that must be corrected as soon as possible. Hopefully, the solutions in this tutorial will assist you in fixing it on your system.


