
The KERNEL DATA INPAGE ERROR is a severe BSOD (Blue Screen of Death) error that was also present in previous versions of Windows. It is now affecting Windows 11 users as well. Incorrectly connected connections, damaged RAM, or a bug interfering with the system are the most common causes of this error. Fortunately, there are several strategies you may attempt to resolve the issue, so you don’t have to worry. Remember that the procedures listed below can only resolve software-based problems, although they may be useful in identifying a hardware-based issue if it is the reason. Let’s get started.
KERNEL DATA INPAGE ERROR In Windows 11? How To Fix
Run Windows Memory Diagnostic Tool
You may detect and locate problems with the RAM module installed on your computer with the assistance of the Windows Memory Diagnostic tool. This will assist you in determining if the issue is hardware-related.
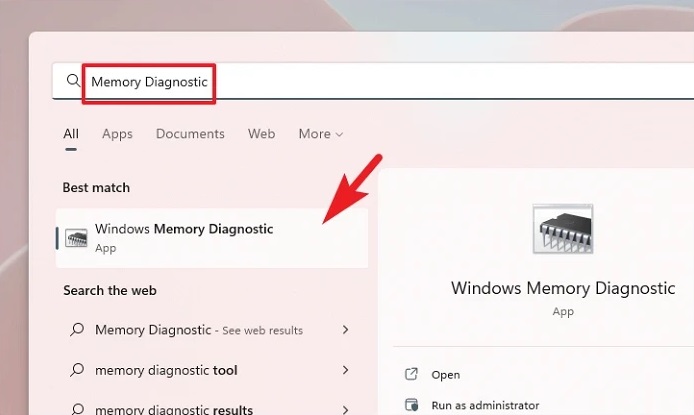
1 – Navigate to the Start Menu and enter Memory Diagnostic to perform a search for it. Then, click the ‘Windows Memory Diagnostic’ title to continue from the search results.
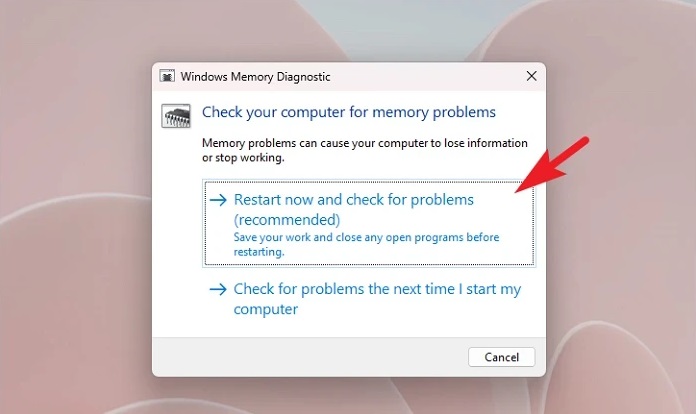
2 – To restart the PC instantly, click the ‘Restart Now and Check for Problems’ option. When you’re comfortable running these checks, click the ‘Check for problems the next time I start my computer’ option.
Run CHKDSK Scan
CHKDSK will check your hard disk for physical and logical errors. This will assist you in locating issues with your secondary storage device.
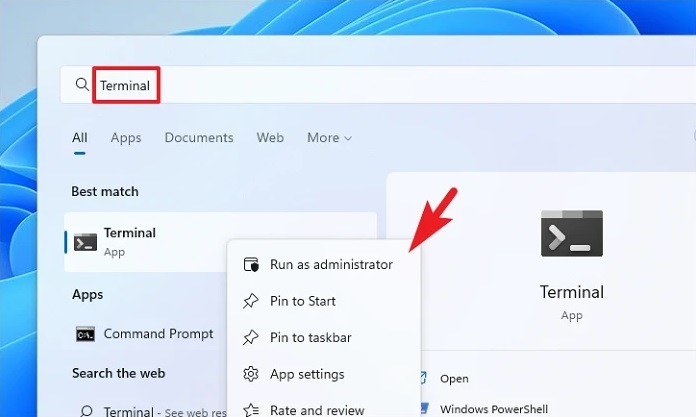
1 – Navigate to the Start Menu and enter Terminal to perform a search for it. To continue, right-click on the ‘Terminal’ title and choose the ‘Run as administrator’ option.
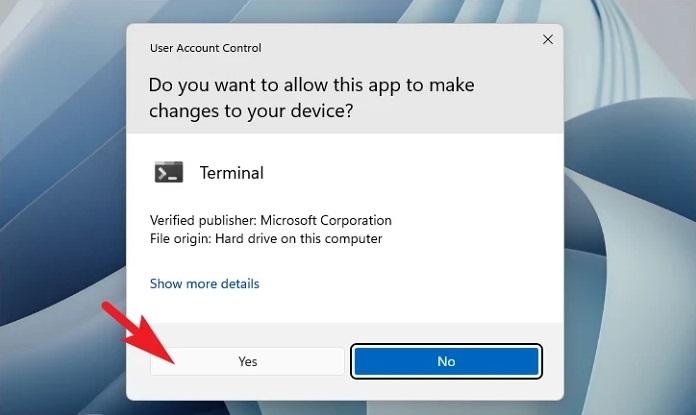
2 – If you are not logged in with an admin account, enter admin credentials on the UAC screen. Otherwise, continue by clicking the ‘Yes’ button.
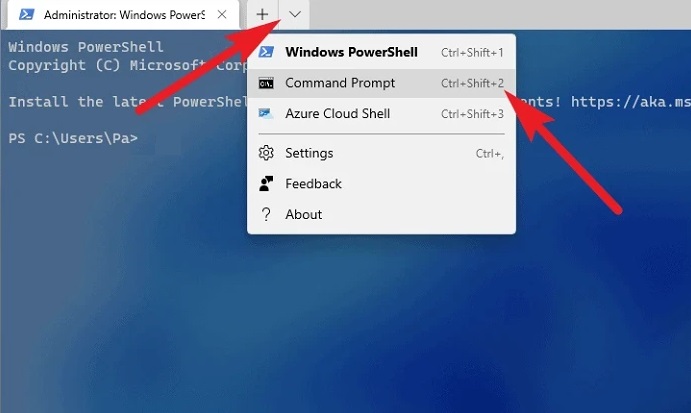
3 – To proceed, click the chevron (downward arrow) and then pick the ‘Command Prompt’ option. The Command Prompt will open in a new tab as a result.
4 – Next, type or copy/paste the following command and press Enter on your keyboard to run it.
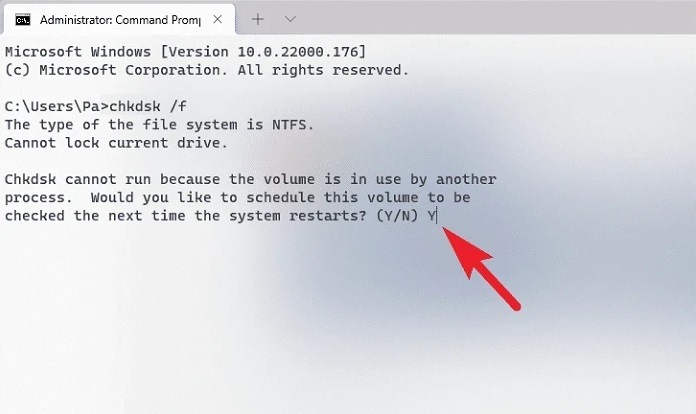
chkdsk /f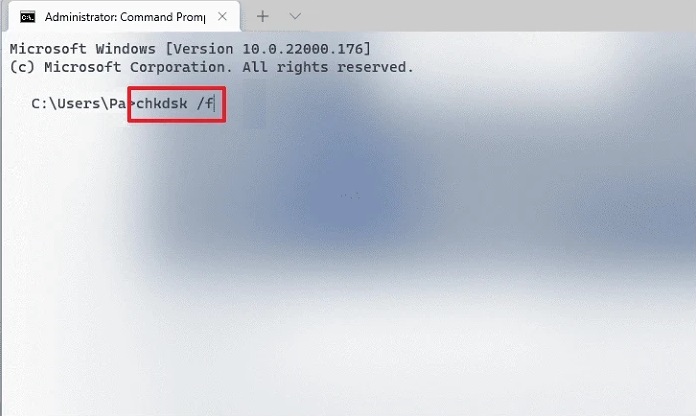
5 – When your computer restarts the next time, press the Y key to schedule the scan to begin.
Run SFC And DISM Scan
Deployment and System File Checker Image Servicing and Management scans will check and repair your device’s current operating system files and other system files.
1 – Go to the Start Menu and type Terminal to search for it. To continue, right-click on the ‘Terminal’ title and choose the ‘Run as administrator’ option.
2 – Create one if you need to log in with an admin account. Otherwise, continue by clicking the ‘Yes’ button.
3 – Click the ‘chevron’ (downward arrow) symbol, then the ‘Command Prompt’ option.
4 – Type or copy/paste the following command and press Enter on your keyboard. This will restore your device’s current operating system image.
DISM /Online /Cleanup-Image /RestoreHealth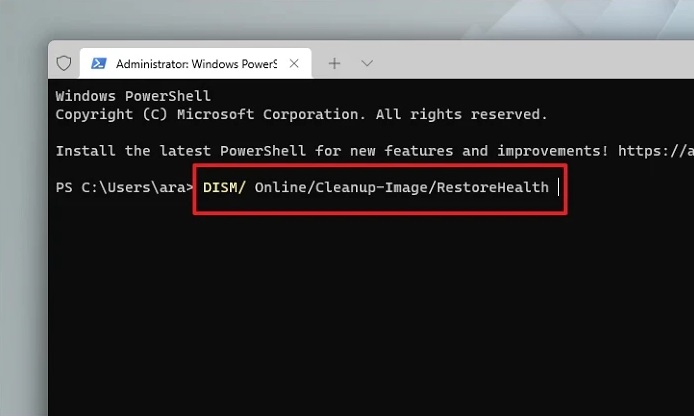
5 – To check and repair the System files on your computer, type or copy/paste the following command.
SFC /scannow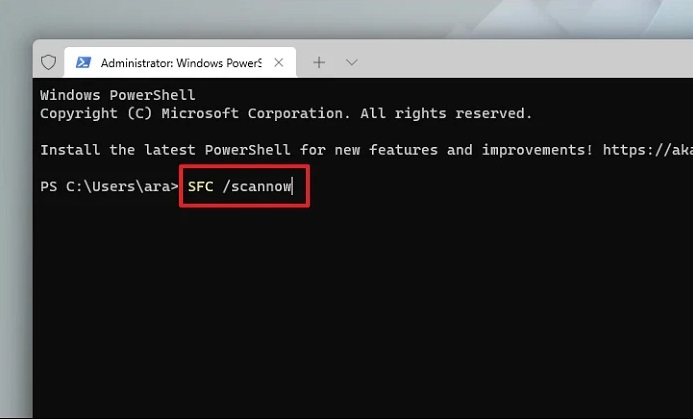
Enable Automatic Paging Of File Size
When the paging file size is not adequately specified, the KERNEL DATA INPAGE ERROR might also occur. It may seem complicated, but changing the option is pretty simple, and Windows does the rest automatically.
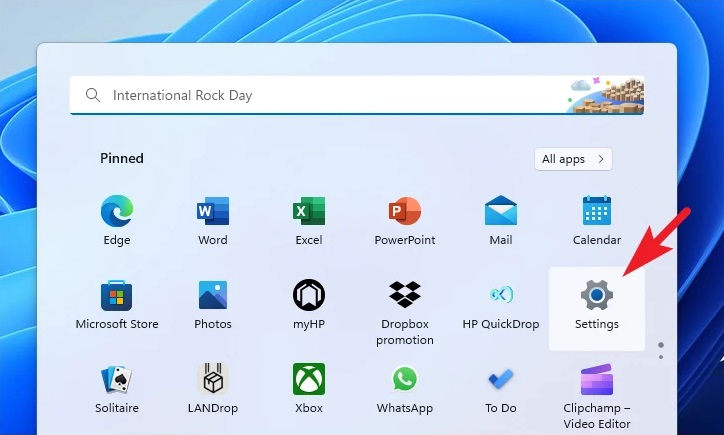
1 – Go to the Start Menu and click the Settings icon. To open the app, press the Windows+I keys on your keyboard simultaneously.
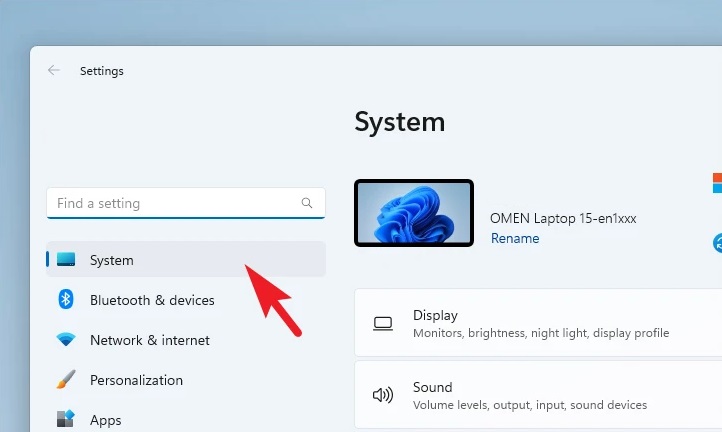
2 – Next, ensure you have picked the ‘System’ tab from the left sidebar.
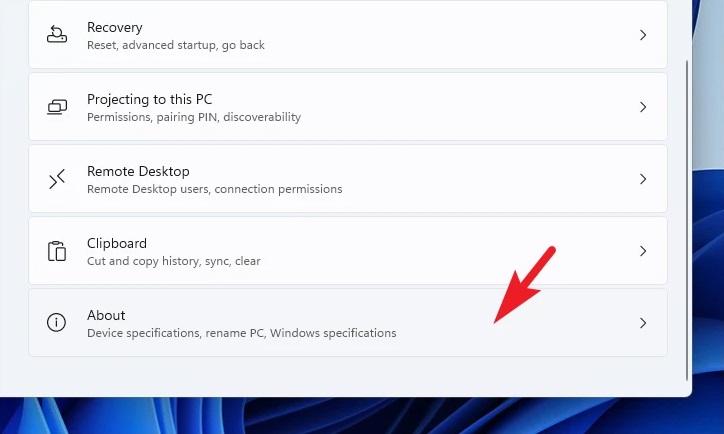
3 – To proceed, click the ‘About’ title from the right area.
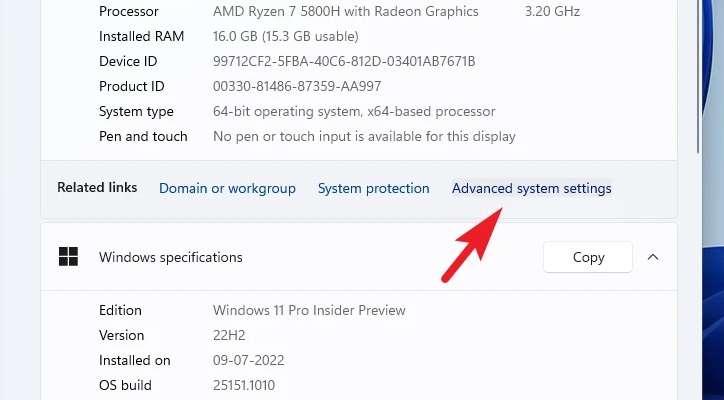
4 – From the ‘Related link’ column, click ‘Advanced system settings.’ On your screen, this will open a new window.
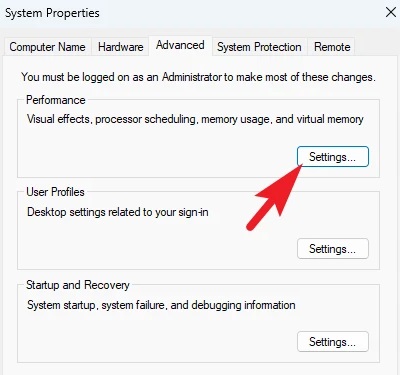
5 – Click the ‘Settings’ button under the ‘Performance’ section.
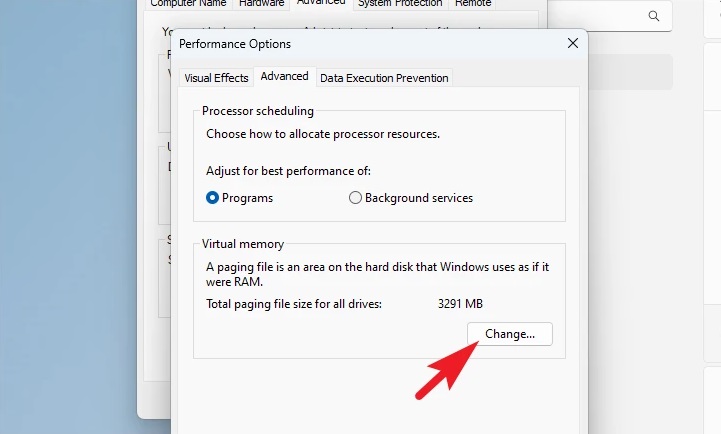
6 – A new window will be opened. Next, click the ‘Advanced’ tab, then the ‘Change’ button under the ‘Virtual Memory’ section. On your screen, this will open a new window.
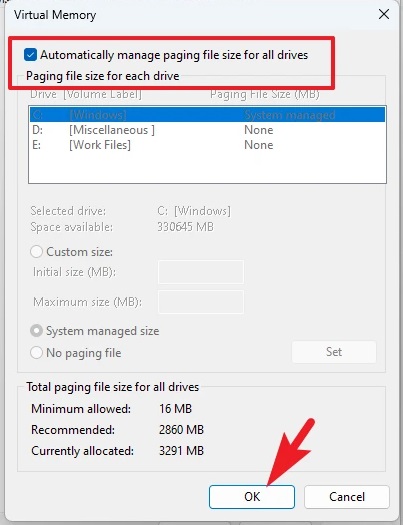
7 – To save the changes, check the box next to the ‘Automatically manage paging file size for all drives’ option. Then, click the ‘OK’ button.
Perform Clean Boot
The system may often need to be improved by a third-party program or service, causing this error. Rebooting the system in clean boot mode may assist you in establishing whether a third-party software/service is the real cause behind the issue.
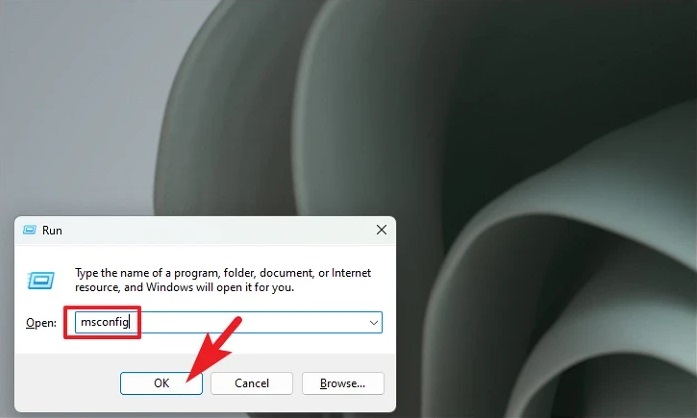
1 – Press the Windows+R keys together on your keyboard to launch the Run utility. Then, to proceed, type msconfig and press Enter on the keyboard.
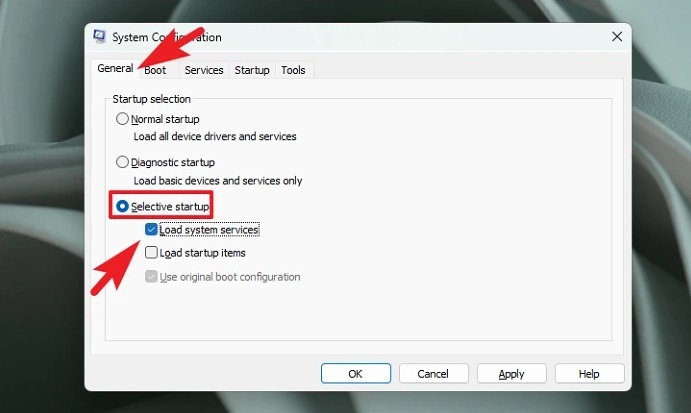
2 – Click the radio button next to the ‘Selective startup’ option and then the checkbox next to the ‘Load system services’ option to continue.
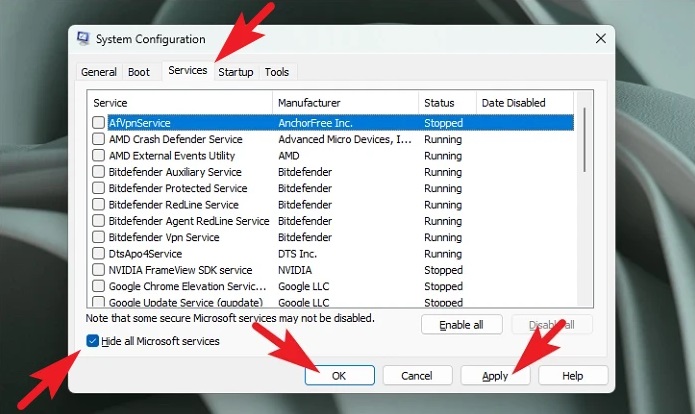
3 – Head to the ‘Services’ tab and click the box next to the ‘Hide All Microsoft Services’ option. Click the ‘Disable all’ button to proceed. Close the window by clicking the ‘Apply’ button and then the ‘OK’ button.
4 – From the Start Menu, restart the computer. You may check whether the issue persists after restarting the computer in clean boot mode. If not, you may activate each process one at a time and check to see which one is causing the issue.
Conclusion:
That’s all there is to it. Although KERNEL DATA INPAGE is a significant BSOD error your computer may encounter, you may quickly diagnose and resolve the issue using the abovementioned techniques.


