
The Device Manager generates Driver Error Code 32. That generally occurs when a certain hardware driver is deactivated. Any hardware components may experience Error Code 32, although optical drivers, CD/DVD players, and Blu-ray players are the most common places where it happens. That is a driver issue since it is plainly stated. As a result, you must eliminate any driver-related issues, including an outdated driver, corrupt/damaged driver, incompatibility, or wrong driver configuration. We have listed all of the solutions for your convenience. But, you may need to attempt many approaches to get to the bottom of the problem.
Driver Error Code 32 In Windows 11? How To Fix
Update Driver
You must confirm that your driver is current and that it is the most recent version. Then, go to the Device Manager and update the driver from there.
Note: To demonstrate, we will update the ‘Touchpad’ driver since the test PC lacked an optical/DVD drive. But, the method is substantially the same.
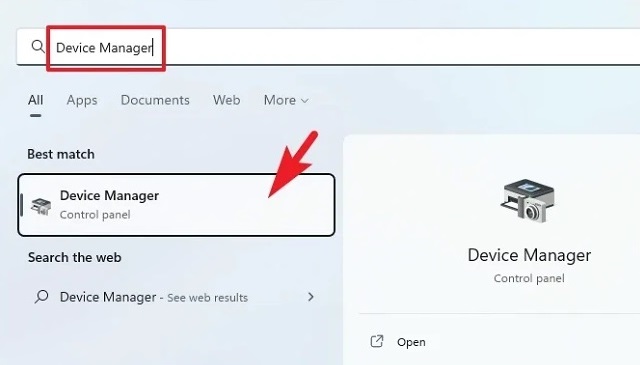
1 – Go to the Start Menu and type ‘Device Manager’ to perform a search. Then, click the ‘Device Manager’ title.
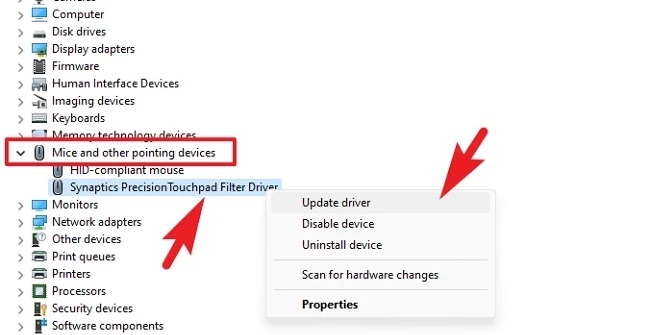
2 – Double-click on the ‘Mice and other pointing devices’ option to proceed. Next, right-click on the ‘Touchpad’ option and select ‘Update driver.’ This will bring up a new window.
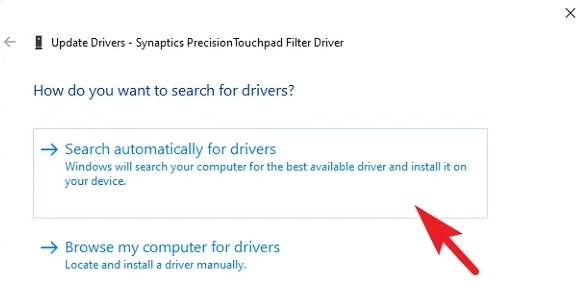
3 – To allow Windows to search for and update drivers automatically, click the ‘Search for drivers automatically’ option.
Reinstall Driver
If upgrading the driver did not remedy the issue, or you could not find an update on the Windows server, reinstalling may help.
1 – Go to the Start Menu and type ‘Device Manager’ to search for it. Then, click the ‘Device Manager’ title in the search results to open it.
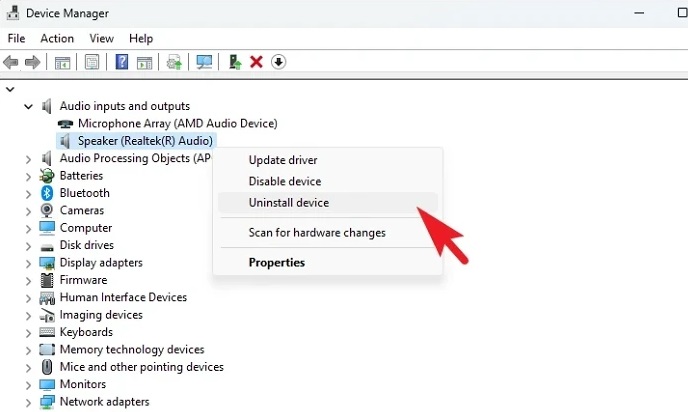
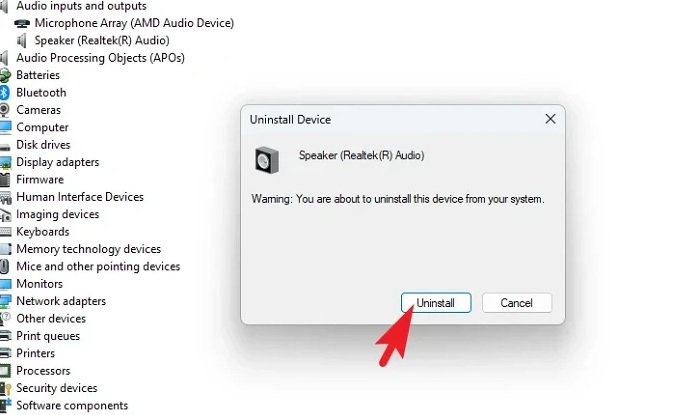
2 – In the Device Manager window, locate the ‘Audio inputs and outputs’ label, and then click the tiny chevron icon (downward arrow) before it to expand the section. If you’ve been having problems with the audio driver, right-click on the ‘Speakers’ option and select the ‘Uninstall Device’ option from the context menu. This will bring up a new window pane.
3 – Select the ‘Attempt to remove the driver for this device’ option in the newly opened window, then click the ‘Uninstall’ button.
4 – Restart your Windows computer right now. The system will recognize the missing driver and install the most recent version.
Roll Back Driver
Rolling back to the previous version may assist if you recently upgraded the driver and have been facing the issue subsequently.
1 – Open the Start Menu and type “Device Manager.” Next, click the ‘Device Manager’ title in the search results.
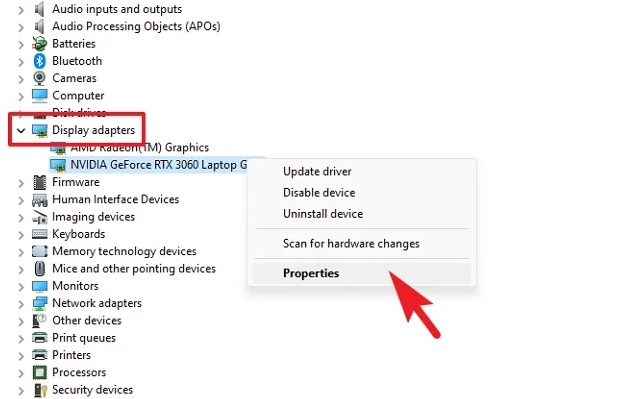
2 – Double-click on the chevron icon to expand the section you’re having problems with. Next, select ‘Properties’ from the context menu after right-clicking on the component for which you wish to roll back the driver update.
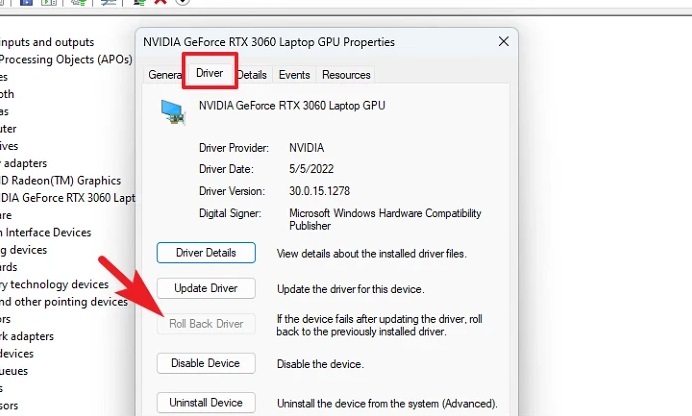
3 – Go to the ‘Driver’ tab and click the ‘Roll Back Driver’ button. On your screen, this will open a new window.
Choose a Reason for Rollback by clicking on it in the other window that displays. Click the ‘Yes’ button to proceed. Windows may take a few seconds to roll back the driver update, but you will not be notified of its progress. Wait a few minutes, then shut the Device Manager and restart the computer.
Roll Back To System Restore
You may roll back to a system restore point if you think a recent software update or third-party program installation is to blame for the issue.
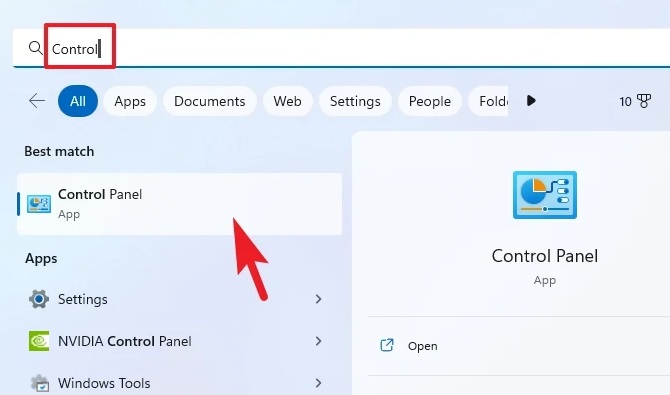
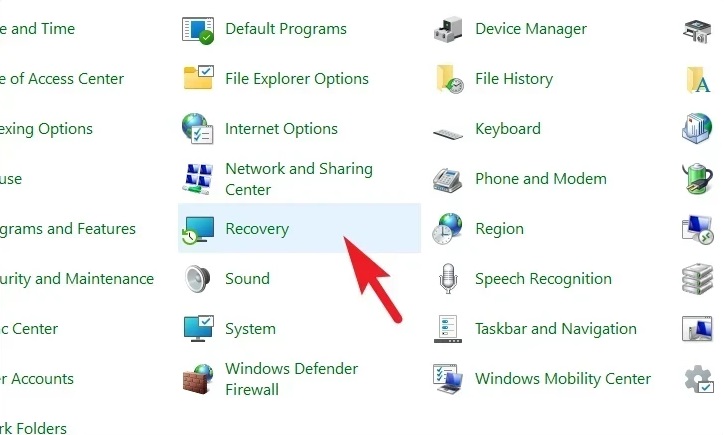
1 – Navigate to the Start Menu and type Control to perform a search. Next, click the title ‘Control Panel’ from the search results to continue.
2 – Locate the ‘Recovery’ title, and then click it.
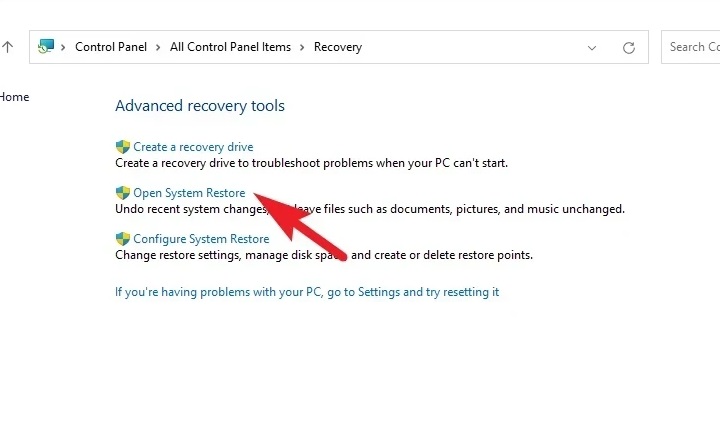
3 – Click the ‘Open System Restore’ option from the list. On your screen, this will open a new window.
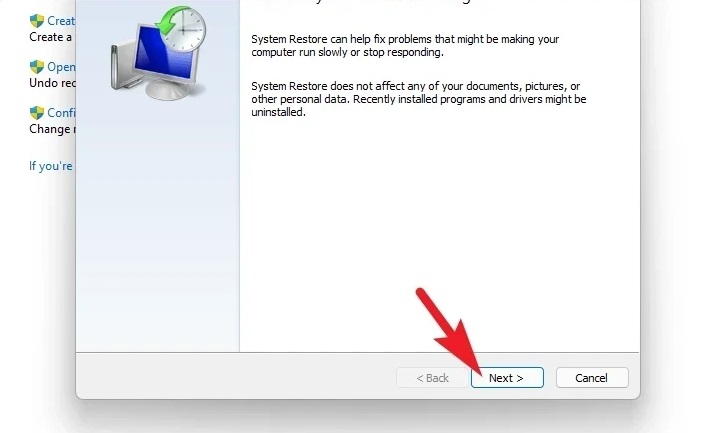
4 – Click the ‘Next’ button in the newly created window.
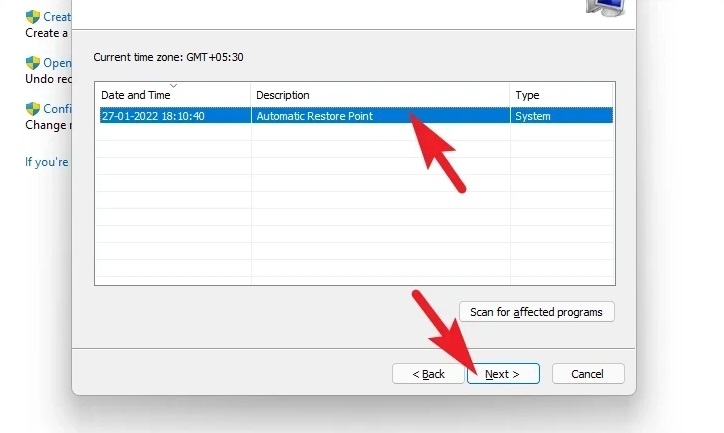
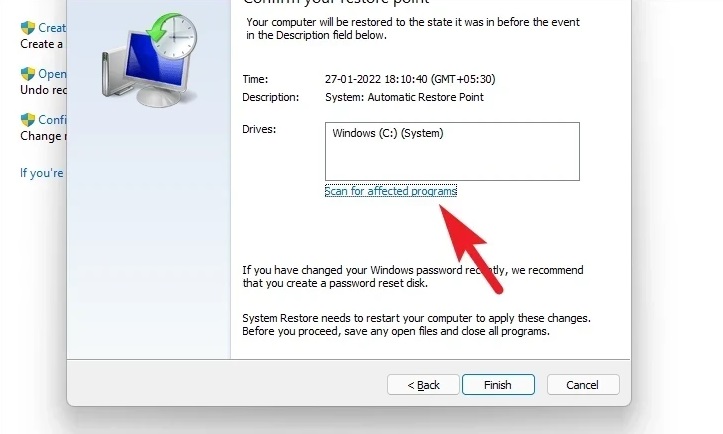
5 – Listed on the screen are all the system restore points that have been established. To initiate the rolling back procedure, click to select the preferred one and then click the ‘Next’ button.
6 – After that, a list of discs that will be affected by the rollback will be presented, as well as the date of the restore point generated. You may also see which programs will be affected by clicking the ‘Scan for all affected programs’ option. Then, a new window will be opened.
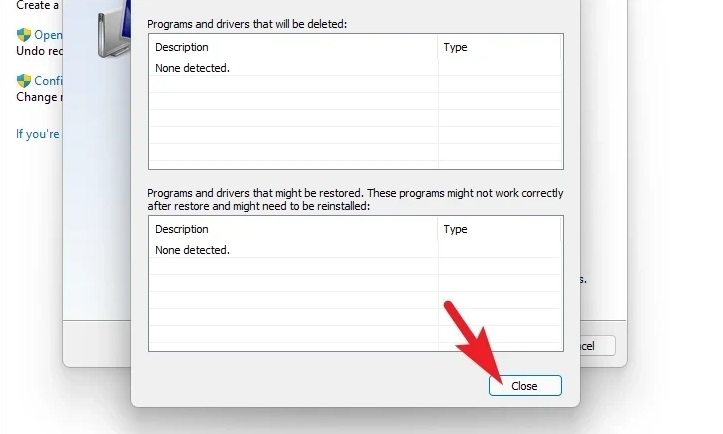
7 – In the new window, you can see which programs will be destroyed and which will be restored. To navigate back to the previous window, click the ‘Close’ button.
8 – To initiate the rollback procedure, click the ‘Finish’ button.

Tweak Registry Files
If you don’t have a system restore point to which you can roll back, you may attempt to alter specific registry files using the Registry Editor.
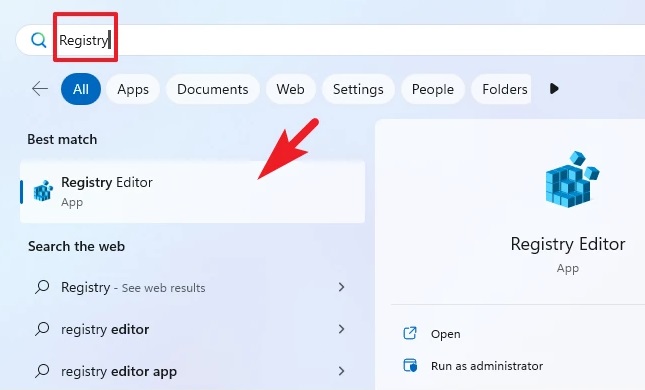
1 – Navigate to the Start Menu and type Registry to perform a search. Next, click the title ‘Registry Editor’ from the search results to proceed.
2 – Now, type or copy+paste the following URL in the address bar and press Enter to navigate the directory.
HKEY_LOCAL_MACHINE\SYSTEM\CurrentControlSet\Services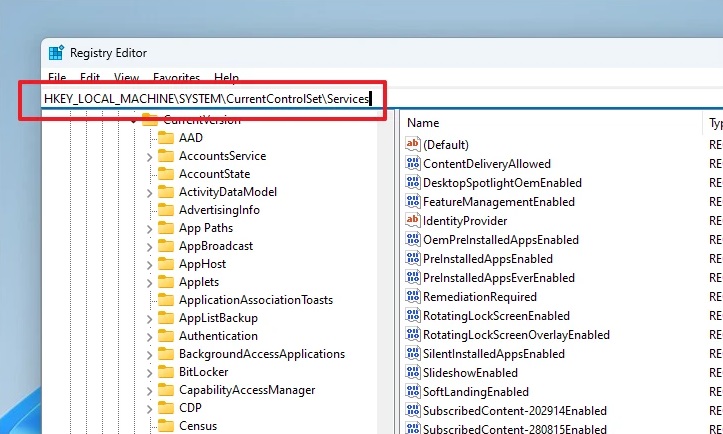
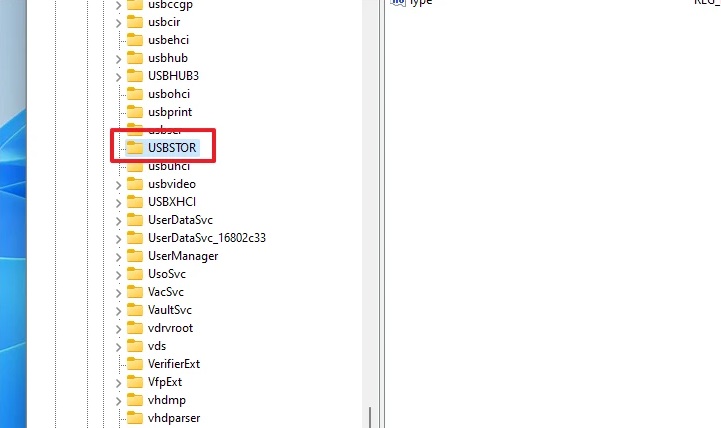
3 – Locate the folder containing the component causing system errors. For example, click the ‘USBSTOR’ key if facing this error with a USB mass storage device.
4 – Double-click on the ‘Start’ key on the right section of the window.
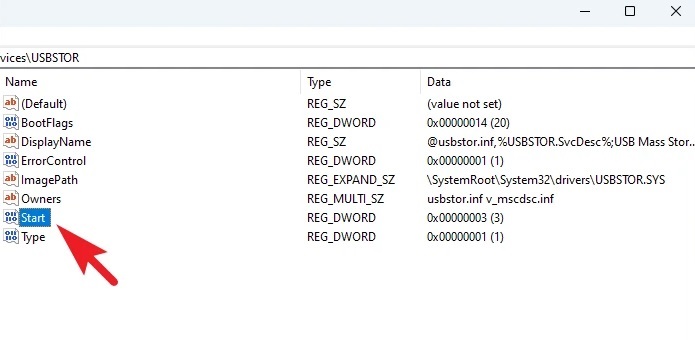
5 – Change the value of the ‘Value’ field to 3.

Delete Registry Files From Specific GUID Class
A unique GUID (Globally Unique Identifier) class is assigned to each device driver in the registry. GUID assists you in diagnosing and repairing registry files related to the driver you’re facing an error with on your system.
1 – Go to the Start Menu and type Registry. Click the ‘Registry Editor’ title from the search results.
2 – Type or copy+paste the URL below into the address box and press Enter to navigate it.
Computer\HKEY_LOCAL_MACHINE\SYSTEM\CurrentControlSet\Control\Class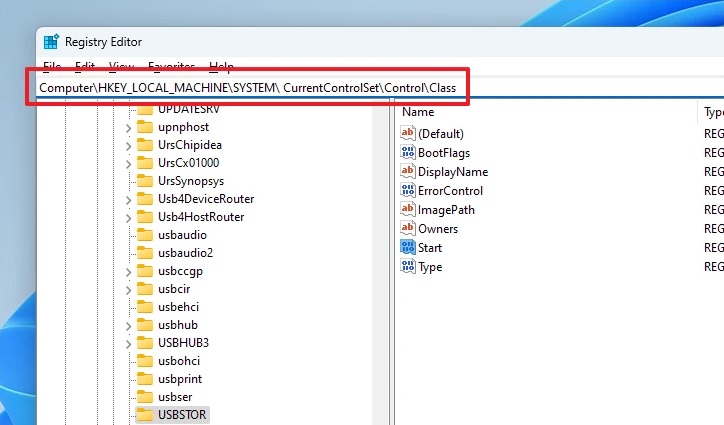
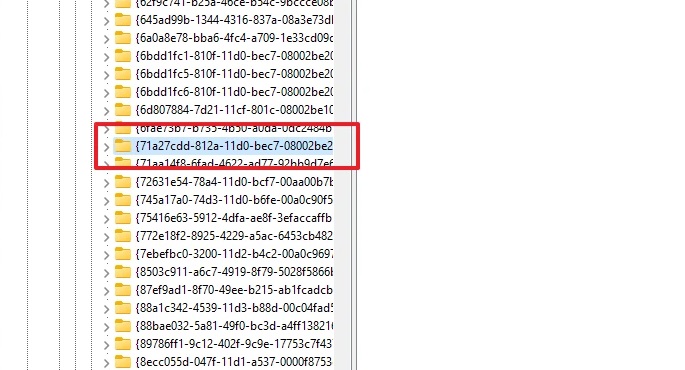
3 – Find the GUID sub-class for the hardware component with which you’re facing the error and click to select it. Go to learn.microsoft.com/en-us/windows-hardware/drivers to learn more about system-defined classes.
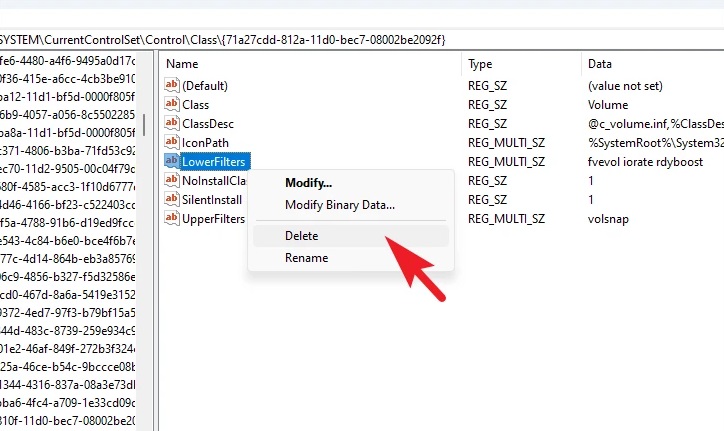
4 – Then, in the right section of the window, right-click on the UpperFilters DWORD file and click the ‘Delete’ option.
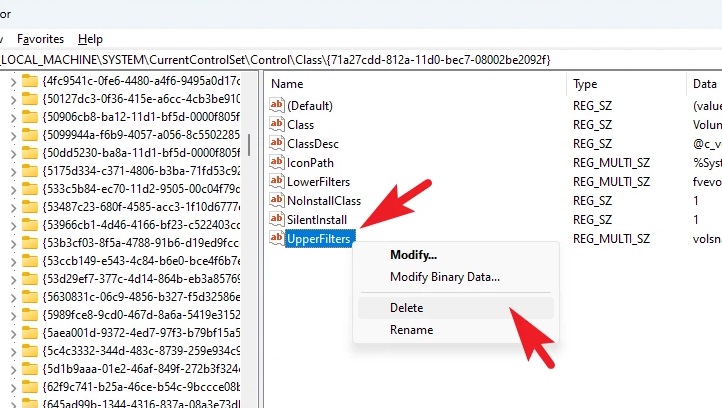
5 – Use the LowerFilter DWORD file in the key to performing the procedure again.
Conclusion:
Your routine may need to be improved by error code 32. But, employing the techniques described above will make diagnosing and fixing error code 32 on your device a snap.


