
Well, if you’ve been using Windows for a while, you’re familiar with the Blue-Screen-of-Death (BSOD) error. CLOCK WATCHDOG TIMEOUT is another one of Windows’ BSOD errors that causes your system to shut down and restart. And, like any other BSOD error, this one is irritating to deal with, particularly because it also forces a restart of your PC. This type of error might occur on your computer for various reasons. Nevertheless, the good news is that it is quite simple to diagnose, and at times, if the issue is software-based, it is also simple to fix. However, if the issue is with the hardware, things may get more complicated, and you may require expert assistance to resolve the issue on your computer.
Why Does The CLOCK WATCHDOG TIMEOUT Error Occur?
As noted previously in the book, the error might arise on your PC for various reasons. Though the exact reason varies depending on the user, some of the most typical causes of this error include a blocked CPU, malfunctioning RAM modules, and malicious drivers. Furthermore, remember that this error might be software- and hardware-based since various fixes have worked for different users. As a result, diagnosing and resolving software issues rather than hardware ones is preferable since they are often considerably simpler. So, let’s head on to correcting the error now that you understand why it occurred.
CLOCK WATCHDOG TIMEOUT Error On Windows 11? How To Fix
Remove USB Devices
Though it may be a simple fix, it may perform miracles. First, remove any USB peripherals attached to your PC, such as USB drives, hard disks, or any other device connected through the USB connection. Then, check whether the CLOCK WATCHDOG TIMEOUT error has been handled. If so, the linked device might be the source of the issue.
Run DISM And SFC Scan
Run DISM and SFC scan on your computer as another solution. The DISM utility will check your PC for faulty or damaged system files. The SFC will then check and, if necessary, repair the presently installed system image.
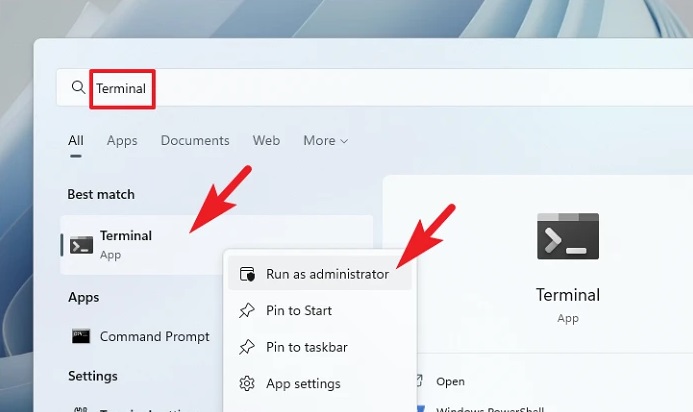
1 – To run the DISM on your system, go to the Start Menu and type Terminal to search for it. Choose ‘Run as administrator’ option from the search results by right-clicking on the ‘Terminal’ title.
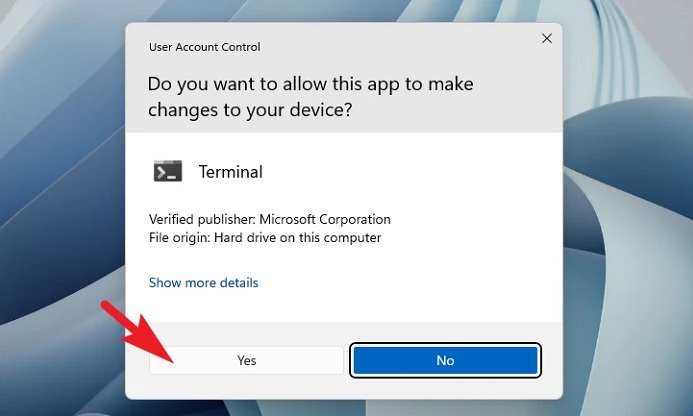
2 – Your screen will display a UAC (User Account Control) window. Enter the credentials for an admin account if you still need to be signed in. Otherwise, click the present ‘Yes’ button in the window to proceed.
3 – In the Terminal window, type or copy+paste the following code and press Enter on your keyboard to run the command.
DISM/ Online/Cleanup-Image/RestoreHealth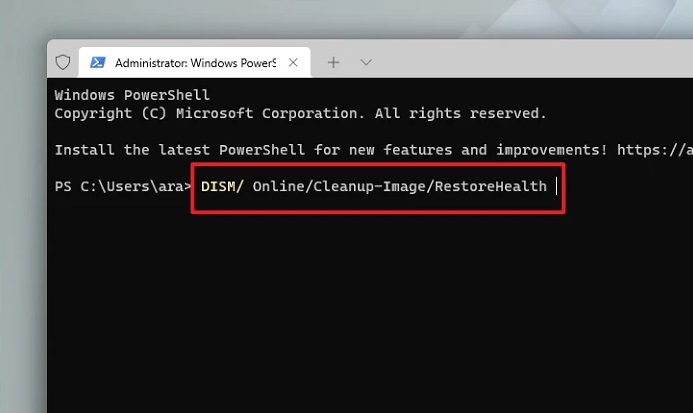
4 – Depending on the speed of your internet connection, the DISM command may take several minutes. It may look stuck at times, but this is typical command behavior. Wait patiently till the execution is finished.
5 – Once done, type or copy/paste the command below to launch SFC (System File Checker), which will scan your presently installed Windows image and fix any damaged or corrupted files with the one you downloaded in the previous step.
SFC /scannow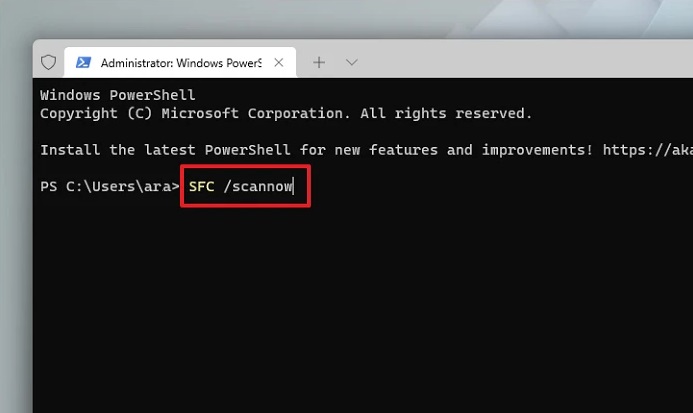
6 – Go to the Start menu and restart your PC when the SFC command has done running. Check whether the issue is still present after the restart.
Update Or Install Missing Drivers
A missing, damaged, or malicious driver may be one of the reasons your system is experiencing this issue. However, it is worth a go since upgrading and/or installing a driver on your system is a simple process. You may update the driver via the Settings app or the Device Manager.
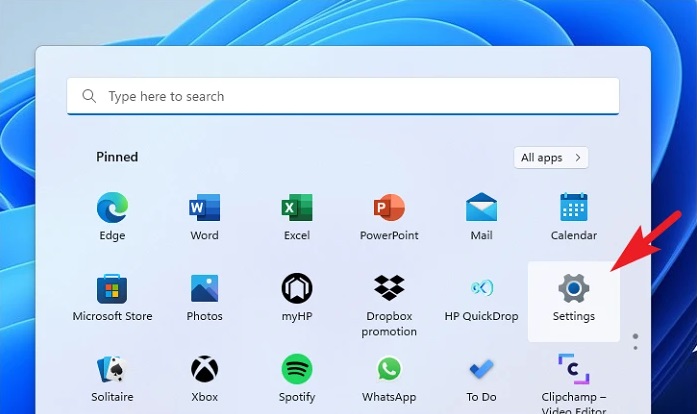
1 – To install or update the driver via the Settings app, go to the Start Menu and click the ‘Settings’ icon title under the ‘Pinned apps’ section. Alternatively, you may simultaneously open the app by pressing the Windows+I keys on your keyboard.
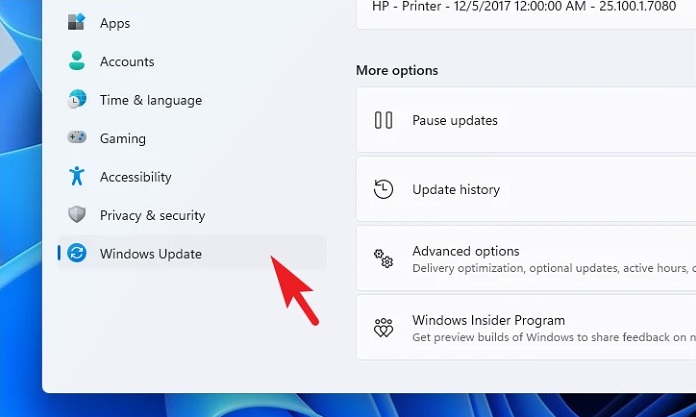
2 – On the Settings window, click the ‘Windows Update’ option in the left sidebar.
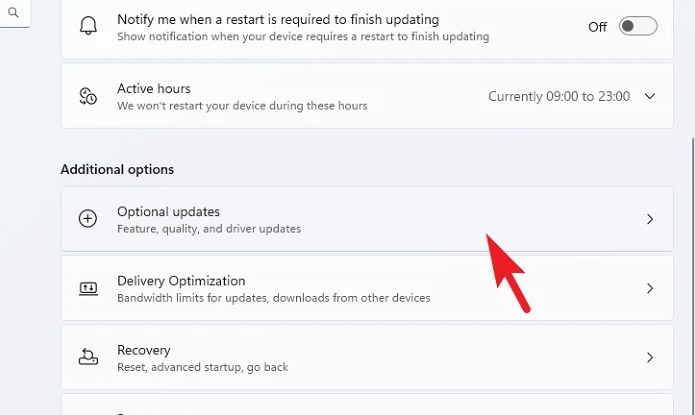
3 – Click the ‘Advanced options’ title, which is present beneath the ‘More options’ section, from the right side of the window.

4 – Scroll down and click the ‘Optional updates’ title, which is present under the ‘Additional options’ section, on the subsequent screen.
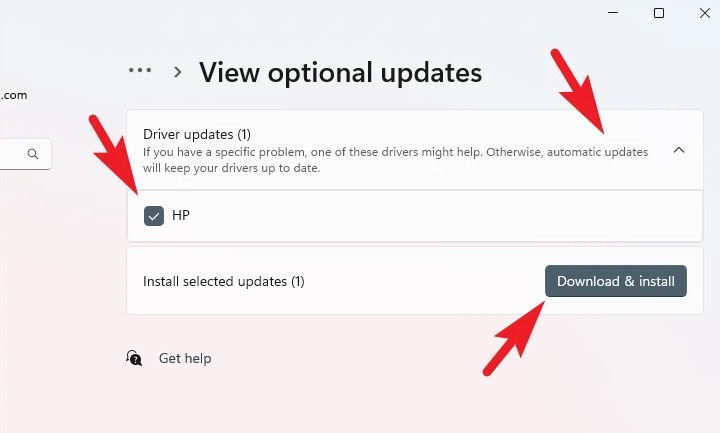
5 – To enlarge the ‘Driver updates’ title, locate and click it. Then, locate the available driver from the list of available drivers and select it by clicking the checkbox next to the specific item. Finally, to begin installing the driver, click the ‘Download & install’ option at the bottom of the screen.
Using the Device Manager, you may also install the missing driver. Again, it’s a rather simple process. Using the Device Manager is easier if you need to install or update many drivers on your system.
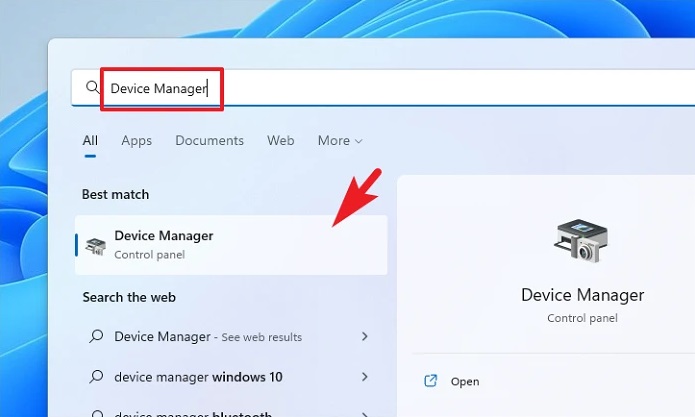
1 – Go to the Start Menu and type Device Manager into the search field to perform a search for it. Then, click the ‘Device Manager’ title from the search results to open the app.
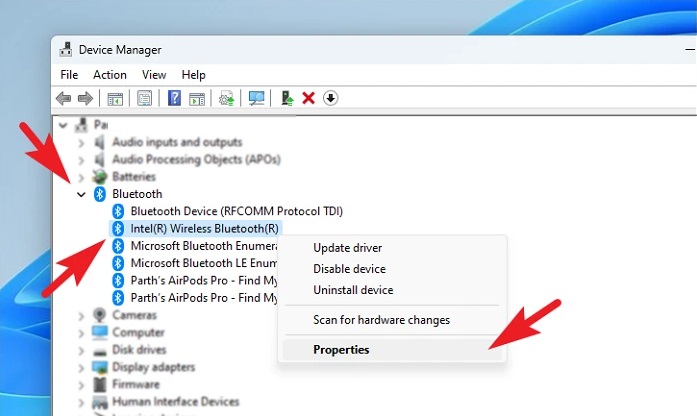
Note: We’ll upgrade the ‘Bluetooth’ drivers to demonstrate the process. Any additional drivers mentioned in Device Manager may be installed using the same process.
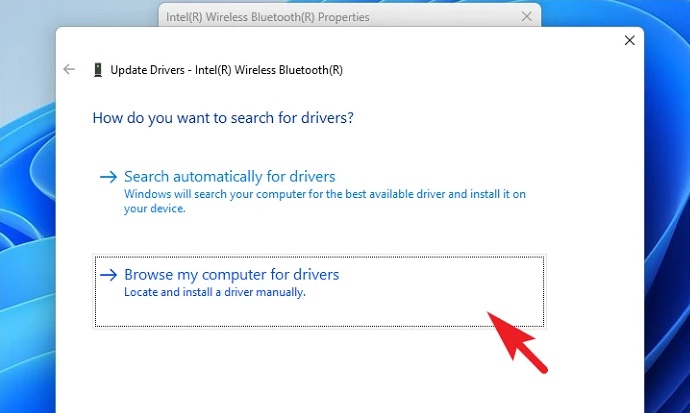
2 – Next, locate and click the downward arrow preceding the ‘Bluetooth’ category in the ‘Device Manager’ window. For example, find the ‘Intel Wireless Bluetooth’ driver in the expanded options, then right-click it to open the context menu. To proceed, click the ‘Properties’ option. On your screen, this will open a new window.
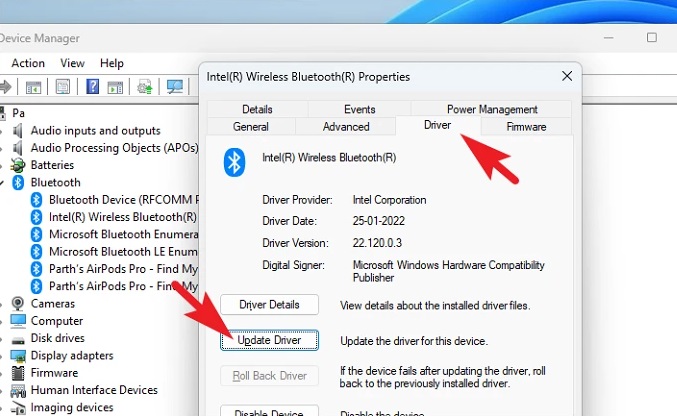
3 – You may view the current status of the hardware driver present on your PC in the independently opened window. The window will also indicate if no driver has been found in the case. Then, click the ‘Update driver’ button under the ‘Device status’ section. If you’re here to update an already installed driver, click the ‘Driver’ option in the top section of the window. Then, in the window, click the ‘Update driver’ button that is present to proceed. On your screen, this will open a new window.
4 – Click the ‘Search automatically drivers’ option in the newly created window to instruct Windows to search for the most recent driver available on Microsoft servers.
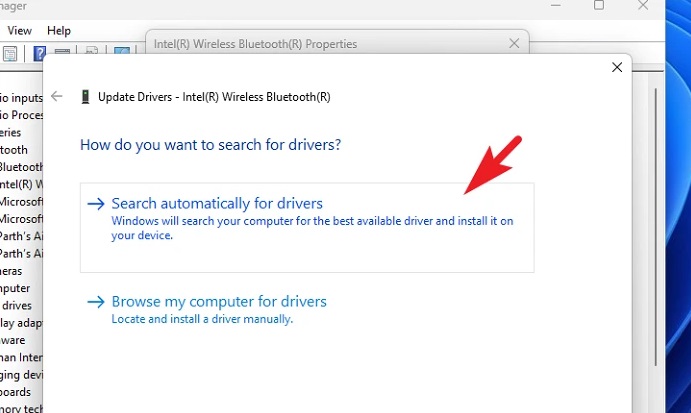
5 – Click the ‘Browse my computer for drivers’ option to proceed if you already have a driver update package. You may explore and select the driver package to update using the File Explorer window that will open on your screen.
6 – You may need to restart your PC to apply the changes once the update/installation has been completed successfully. It may be restarted from the Start Menu.

Run Windows Memory Diagnostics
Windows Memory Diagnostics enables you to diagnose and identify RAM-related issues. The issue is certainly caused by a hardware problem, as previously stated. However, this fix will assist you in determining if bad RAM is the culprit in this situation.
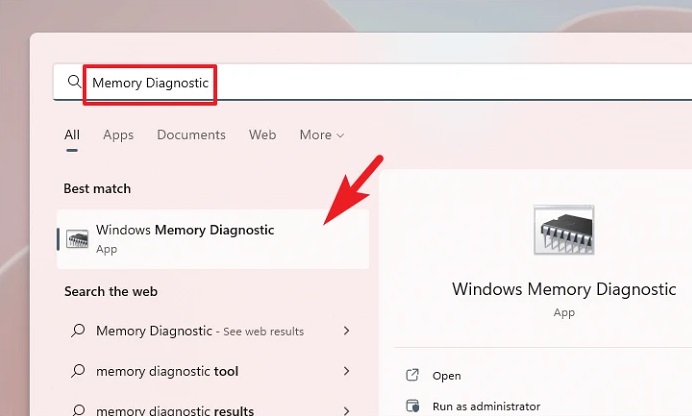
1 – Navigate to the Start Menu and type Memory Diagnostics to perform a search for it. Click the ‘Windows Memory Diagnostics’ title in the search results to proceed.
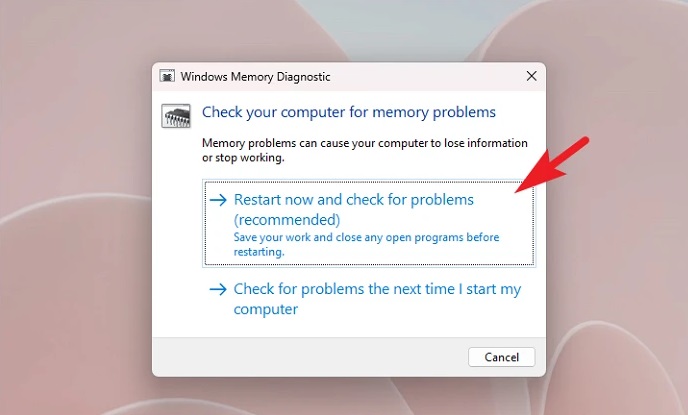
2 – Click the ‘Restart now and check for problems’ title on the ‘Windows Memory Diagnostic’ window to proceed. This will instantly restart your computer and check the installed RAM for any errors that may have occurred during the PC startup process.
3 – The Windows Memory Diagnostic window will display on your PC’s screen when it restarts. The prior scan’s findings may be seen here. You will need to replace your memory module if a problem is discovered.
Update Windows To Latest Build
Typically, all updates are handled by Windows. However, in certain circumstances, your action may be required to finish a necessary update that may be able to fix the problem on your computer.
1 – To update your PC to the current version, go to the Start Menu and click the ‘Settings’ title beneath the ‘Pinned apps’ section. Alternatively, you may open the app by pressing the Windows+I keys simultaneously.
2 – Next, in the Settings window, locate and click the ‘Windows Update’ option in the left sidebar to proceed.
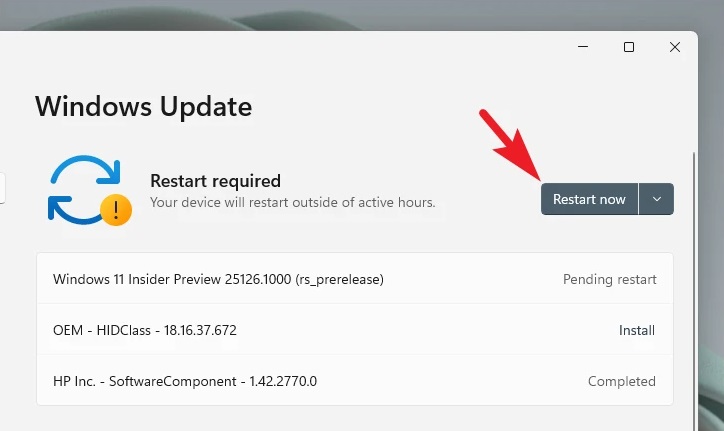
3 – Next, click the ‘Check for updates’ button in the right section of the window to check for any available updates. Then, click the ‘Restart Now’ option to restart your device and apply the updates to your computer if the updates have already been downloaded.
4 – After installing the updates, check whether the error occurs again.
Roll Back To System Restore Point
Suppose you recently upgraded your operating system and/or installed third-party software on your system and have been experiencing this CLOCK WATCHDOG TIMEOUT error. In that case, this recent change is likely the culprit.
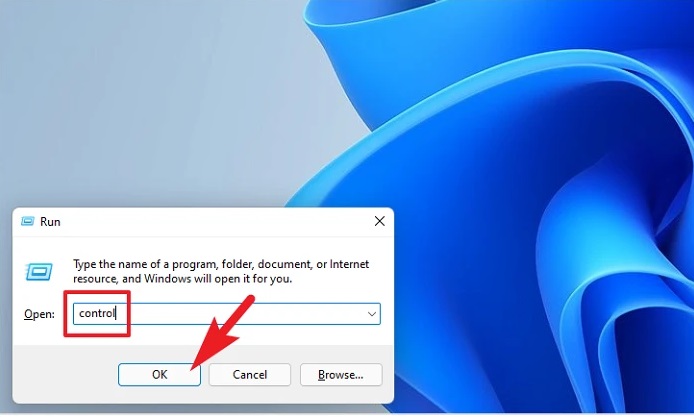
1 – First, press the Windows+R keyboard shortcut to launch the ‘Run Command’ app to restore your PC. Then, to proceed, type control and press Enter on your keyboard. The Control Panel for your machine will open as a result.
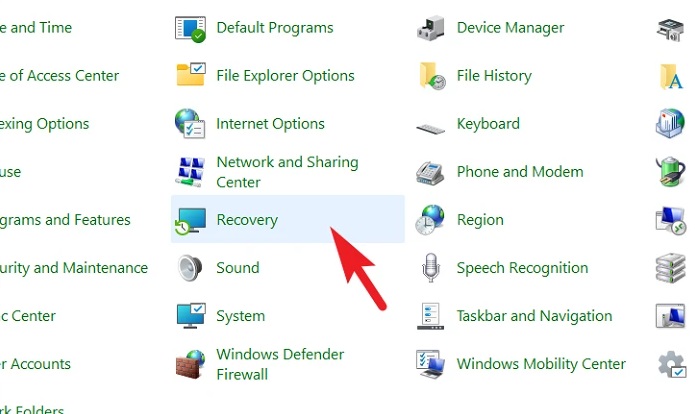
2 – To proceed, locate and click the ‘Recovery’ title in the options grid.
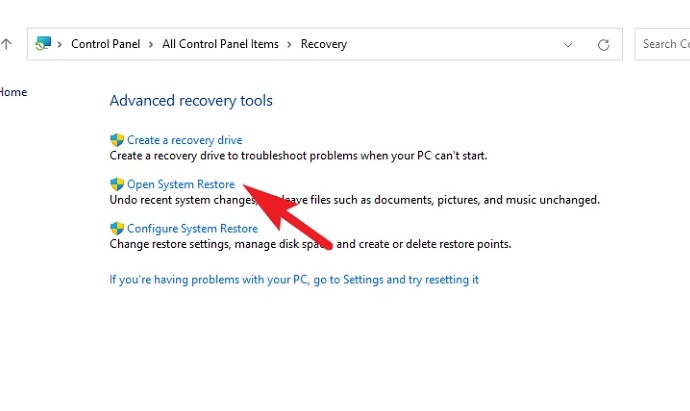
3 – Click the ‘Open System Restore’ option from the list of options on your screen. A new ‘System Restore’ window will open on your screen.
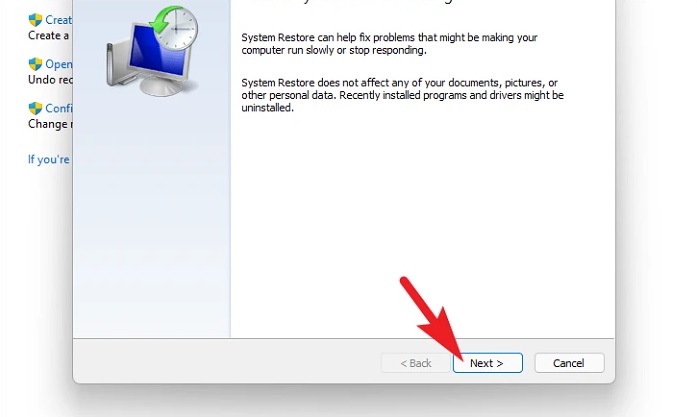
4 – To proceed, click the ‘Next’ button at the bottom of the screen in the independently opened window.
5 – The list of System Restore points you may roll back is then shown. Click to select an item from the list, then click the ‘Next’ button.
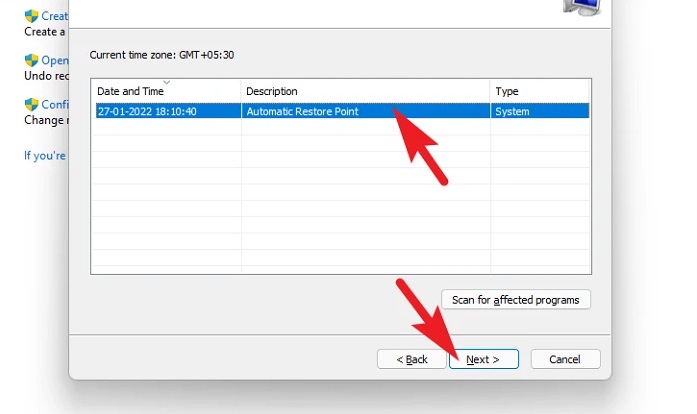
6 – From the ‘Drives’ section, you will see the drives that will roll back using the selected restore point. Next, click the ‘Scan for affected program’ option to view the files and programs that will be affected. This will open a new window.
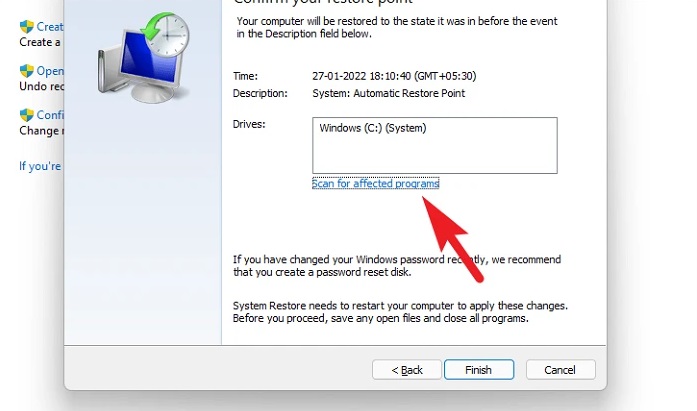
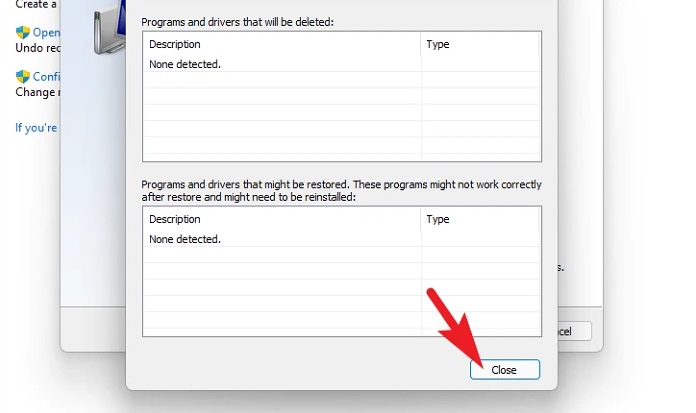
7 – You may view the deleted and restored programs on the new screen (in our case, there were no programs that were going to be affected by the restore, so the list in the screenshot below is empty). To close the window, click the ‘Close’ button.
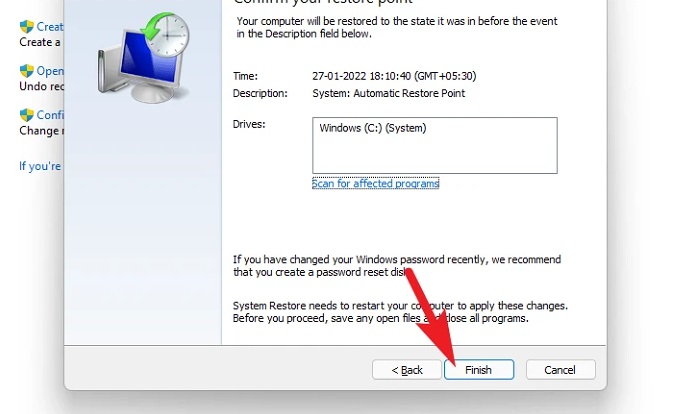
8 – Click the ‘Finish’ option to start the system restore process on your Windows 11 PC.
You wouldn’t have the issue if the error were caused by a recent update or the installation of third-party software. However, in case you are still experiencing the CLOCK WATCHDOG TIMEOUT error, proceed to the next solution.
Reinstall Windows From Settings App
If none of the preceding solutions resolve the issue on your PC, it’s time to pull out the heavy guns and reinstalls the whole operating system. On the other hand, reinstalling the operating system will wipe out all of your files and folders. As a result, it’s strongly advised that you back up the crucial files someplace else before proceeding.
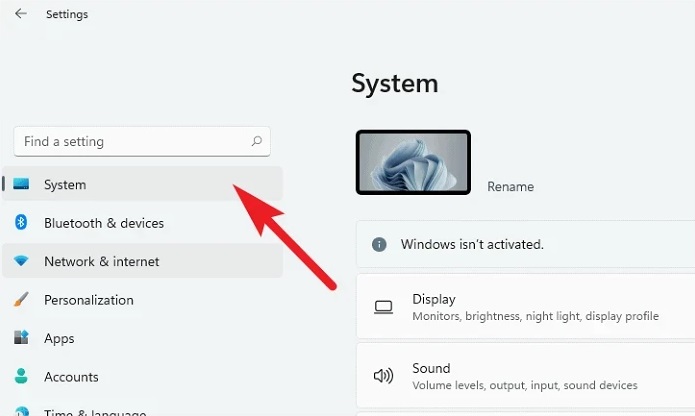
1 – From the Start Menu, select the ‘Settings’ app. Alternatively, you may access the Settings app using the Windows+I shortcut on your keyboard.
2 – From the left panel of the screen, click the ‘System’ tab.
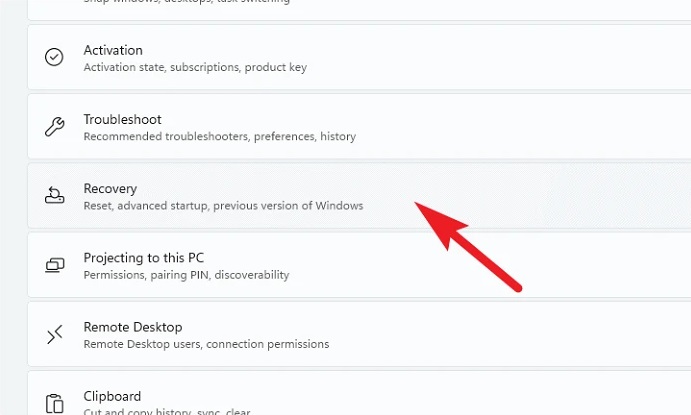
3 – Scroll down and click the ‘Recovery’ tab that is now present on the screen.
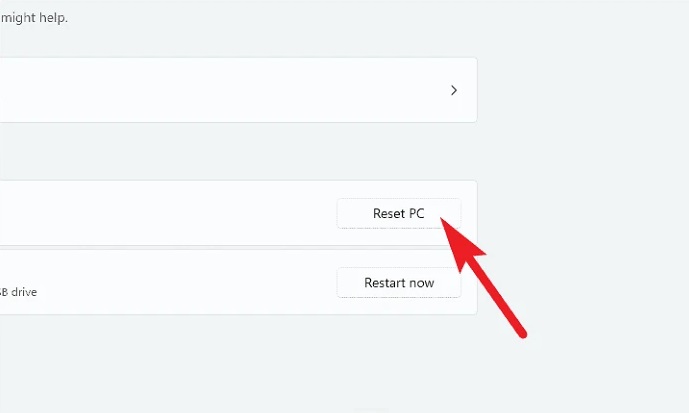
4 – Click the ‘Reset PC’ option on the ‘Recovery Setting’ screen. A new window will open after clicking the ‘Reset PC’ button.
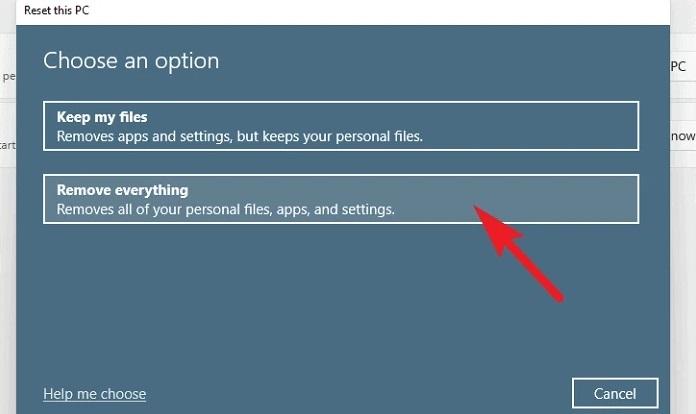
5 – To fully wipe your device clean and reinstall the operating system, select the ‘Remove everything’ option in this separate window.
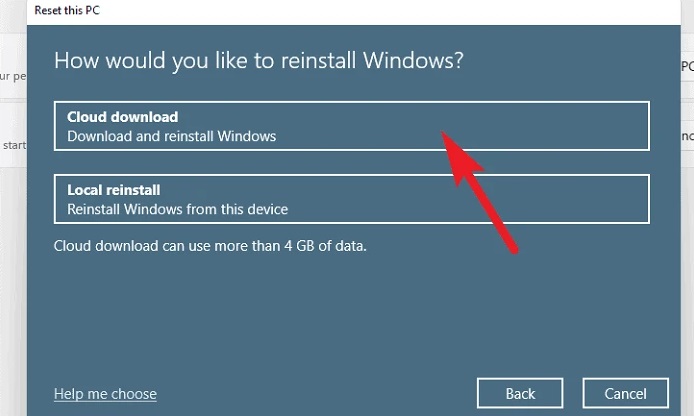
6 – On the next screen, select either ‘Cloud download’ or ‘Local reinstall.’ As the new copy of the OS is downloaded from Microsoft servers, click the ‘Cloud download’ title. Next, click ‘Local reinstall’ to allow the system to collect and reinstall Windows using the files currently on your local storage if your device does not have internet connectivity. None of the options would require you to insert any external installation disks.
Note: The Cloud download option will need at least 4 GB of cellular data.
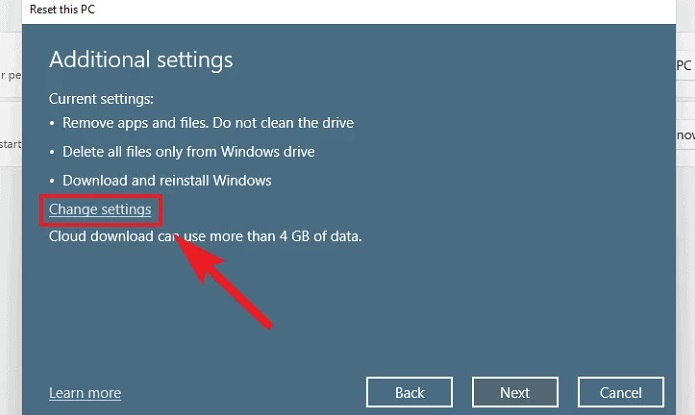
7 – You will then be able to view your current settings for resetting the PC. Click the ‘Change settings’ option if you want to change them. Click the ‘Next’ button on the screen if you don’t want to.
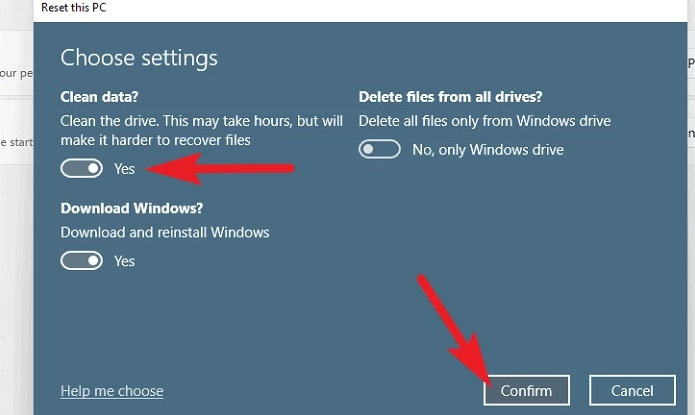
8 – On the ‘Choose settings’ window, there are three options for changing the settings. So let’s get started to improve your machine’s performance.
Clean Data? – When you wish to give away your PC and don’t want anybody else to be able to retrieve your files.
Delete Files From All Drives? – This option allows you to select whether you want to erase data from merely your Windows installation drive or wipe the drive clean. Flip the switch to the ‘Yes’ position to erase files from all drives. Also, if enabled, ‘Clean data’ will apply to all drives.
Download Windows? – This option allows you to switch from cloud download to local reinstall if you need to change the method of reinstallation before proceeding.
9 – Once you’ve toggled the other settings to your liking, click the ‘Confirm’ button to proceed.
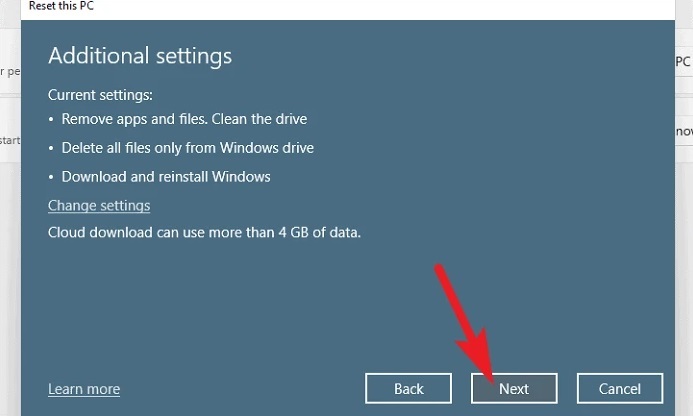
10 – Now, from the bottom section of the window, click the ‘Next’ button.
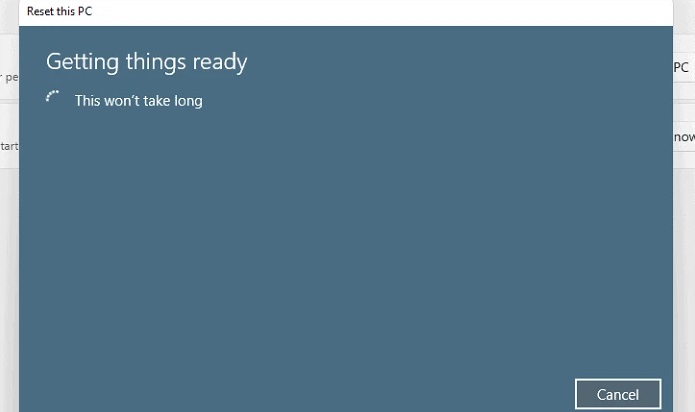
11 – Windows may take some time to load the following screen. Hold your breath as the process runs in the background.
12 – Next, Windows will list all the effects resetting your PC will have. To start the resetting process on your machine, read them and click the ‘Reset’ button.
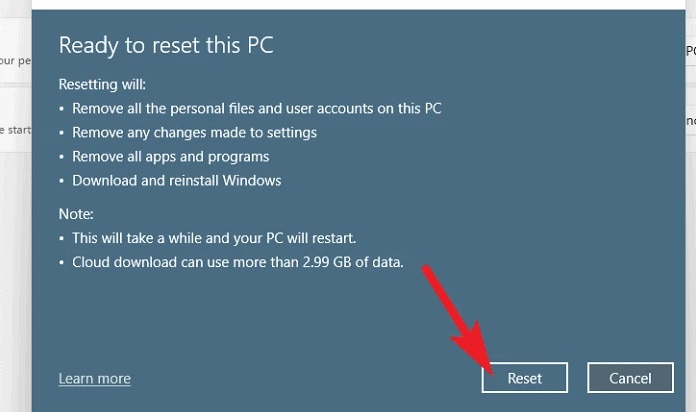
13 – After clicking ‘Reset,’ your computer may restart many times, which is normal throughout the resetting process. Resetting may take many hours, depending on your machine and the settings you select.
Conclusion:
That’s all there is to it, folks. The CLOCK WATCHDOG TIMEOUT error might be a pain, but the above methods can fix this serious issue on your PC.


