
The easiest way to transfer a file to another Windows computer is to share files directly. Computers must be connected to the same network. However, a few users have reported this “Error code 0x80070035.” When transferring a file from one computer to another on the same network, the error “The network path was not found” occurs. The error will prevent you from transferring files across computers. Many Windows 7 users have reported the same error; therefore, the issue is familiar. What is causing this network path not to discover Windows 10 errors? The identical error happens with Windows 11 as well.
A variety of factors might cause the error. It might be your firewall or antivirus that is preventing the file transmission. This 0x80070035 error code is shown when Windows cannot find the network card. You can face this error due to connectivity and authorization issues between your computers. We’ll share how to solve this network error in this article easily.
0x80070035 Error Code In Windows 11 And 10? How To Fix
Make that your computers are connected to the same network before implementing any troubleshooting method. Make that any devices you use to connect computers, such as a switch or router, are operational. We will walk you through the process step by step. To fix the 0x80070035 error on Windows 7 and Windows 10, try the following solutions. First, make sure you’re connected to a VPN as well. Next, turn off your VPN and check again whether you’re connected. If your computer name is too lengthy, several users claim that altering it may fix the network path was not found error.
Enable SMB V1.0
In Windows 10, SMBv1 is not installed by default. SMB v1.0 is in charge of accessing network-shared files and folders on a local network. You will face this 0x80070035 error if the SMB v1.0 protocol on your system is disabled. First, check your SMB v1.0 permissions and enable them if they are disabled. Then, use the following procedures to check whether the SMBv1 protocol is enabled.
1 – Go to the start menu and search for CMD.
2 – To open Command Prompt with administrative privileges, click Run as Administrator on the right window.

3 – Paste the following command into the Command Prompt and hit Enter. This command will inform you if the SMBv1Protocol is enabled or disabled.
Dism /online /Get-Features /format:table | find “SMB1Protocol”

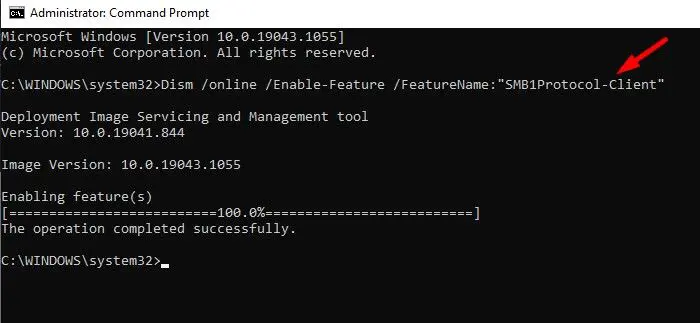
Use the following command to enable the SMB 1 client.
Dism /online /Enable-Feature /FeatureName:” SMB1Protocol-Client”
You may also enable the SMB 1 sharing protocol manually.
4 – Follow the following steps to enable SMBv1Protocol if it is disabled. Otherwise, go to the next solution.
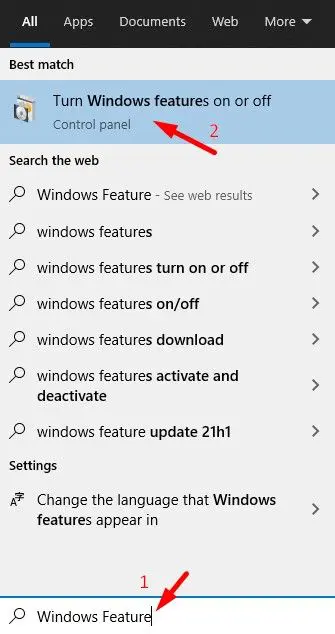
5 – To enable SMBv1, go to the Windows feature options. Search for “Windows Feature” in the start menu.
6 – Now click “Turn Windows feature on or off.”
7 – Select SMB 1.0/CIFS File sharing functionality from the list of options, and then check the box to enable it.
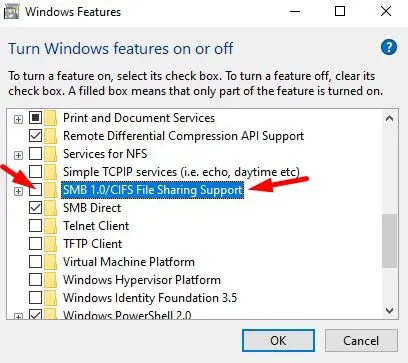
8 – Click OK to save the settings. Remember to restart your computer.
9 – Attempt to share a file with a different computer once again. You will never again face that 0x80070035 error.
Ensure Sharing Is Enabled
You must make any folder or file shareable if you wish to share it. Windows provides the option to enable or disable the security of any folder or file. So you can’t share files even if your computers are connected to the same network. Follow these steps to enable File Sharing.
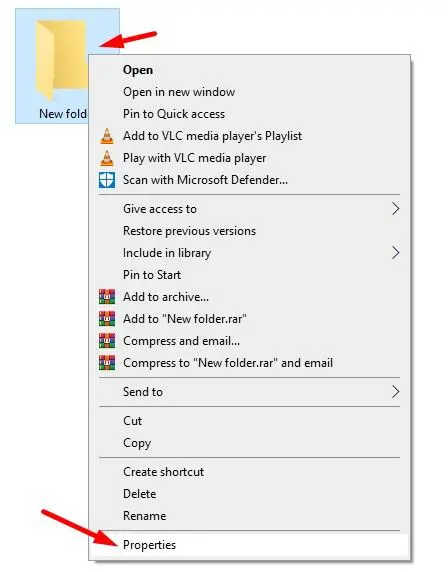
1 – Right-click the folder you wish to share with another computer and select Share.
2 – Next, select Properties.
3 – Select Sharing > Advanced Sharing.
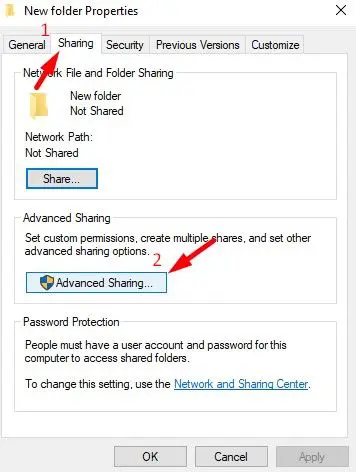
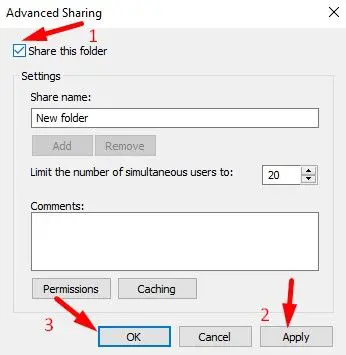
4 – Click Share this Folder, then OK > Apply to preserve the settings.
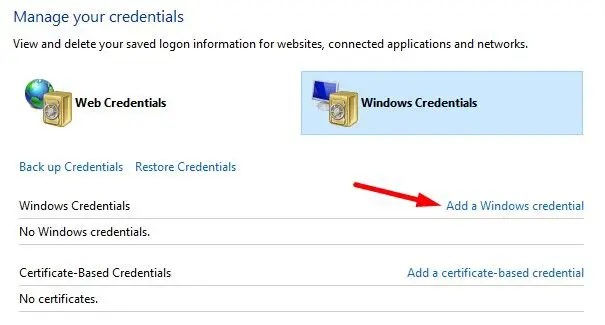
Access NAS And Create New Windows Credentials
Try saving the NAS password to the Windows Credential Manager if you face this Windows 10 network path not found error when visiting the NAS server.
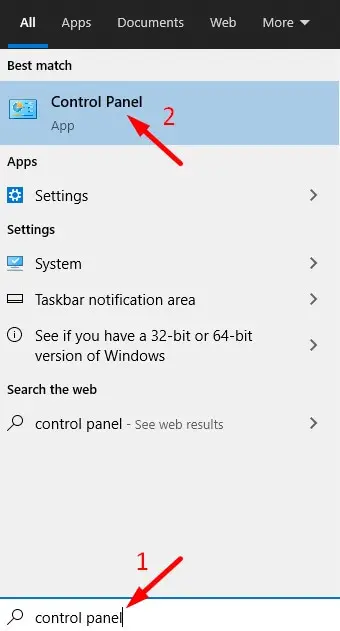
1 – Launch the control panel from the start menu.
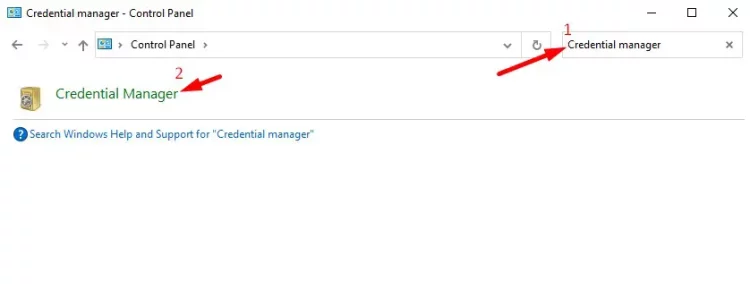
2 – Then, using the search feature, look for “Credential Manager” and click it.
3 – Navigate to Windows credentials and create a new one for the NAS computer.
4 – Go to enable user accounts and passwords.
Control Panel > Network and Internet > Network and Sharing Center > Advanced sharing settings.
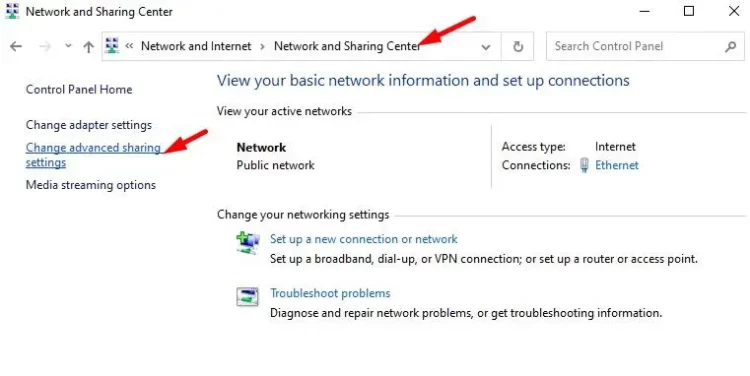
Enable the “Use user accounts and passwords” option to connect to other computers.
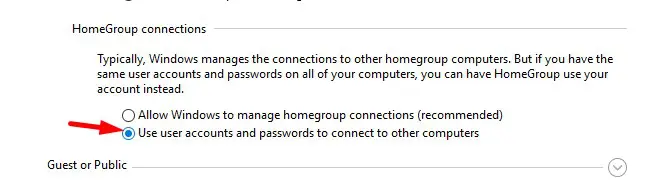
You may now connect to other computers using your user identities and passwords.
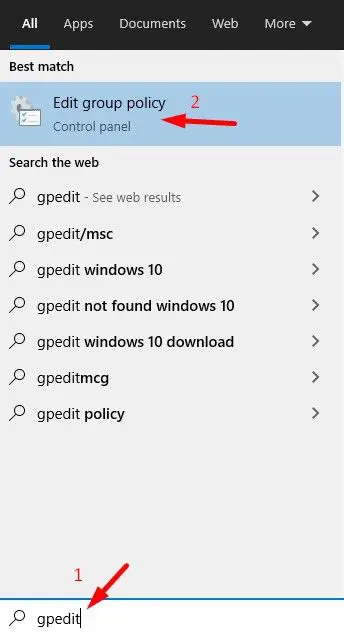
Use Group Policy Editor
Users may modify the system and user configurations and manage objects using Group Policy Editor (gpedit.msc). To solve the issue, you may edit the network object policy.
1 – In the start menu or search bar, type gpedit, and then launch Local Group Policy Editor or gpedit.msc.
2 – Navigate to this directory using the Local Group Policy Editor.
Local Computer Policy > Computer Configuration > Administrative Templates > Network > Lanman Workstation
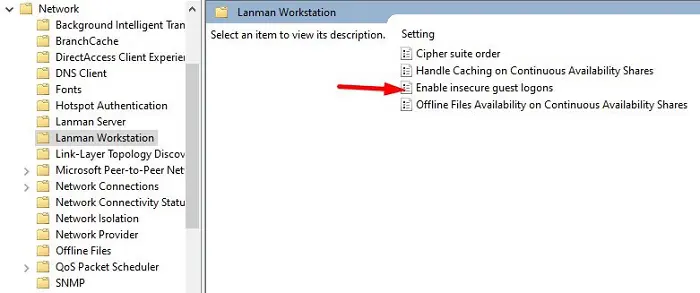
3 – Select Enable by double-clicking Enable unsafe guest logons.
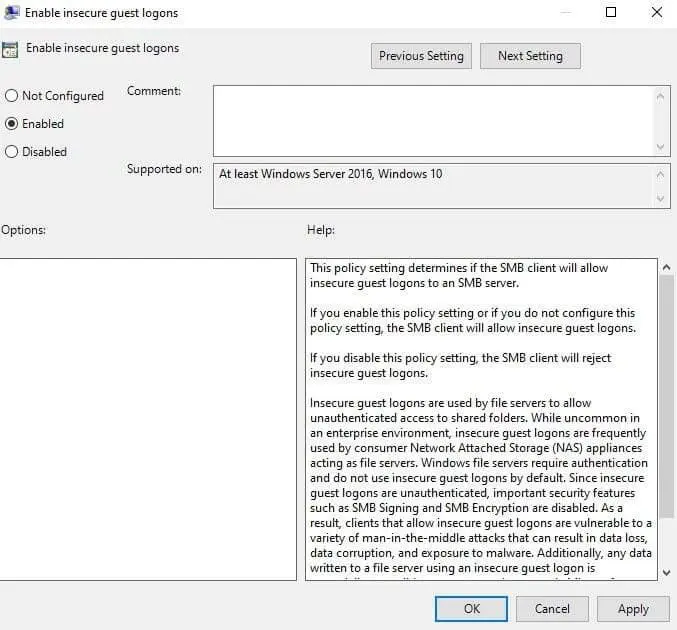
4 – To save settings, click Apply.
You must edit another policy if you cannot share your file.
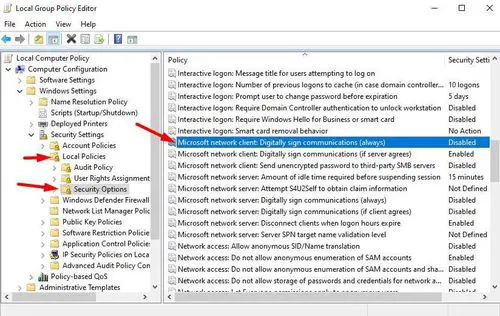
1 – Launch the Local Computer Policy Editor by following the abovementioned steps, and then navigate to the following location.
Local Computer Policy > Computer Configuration > Windows settings > Security Settings >Local Policies > Security Options
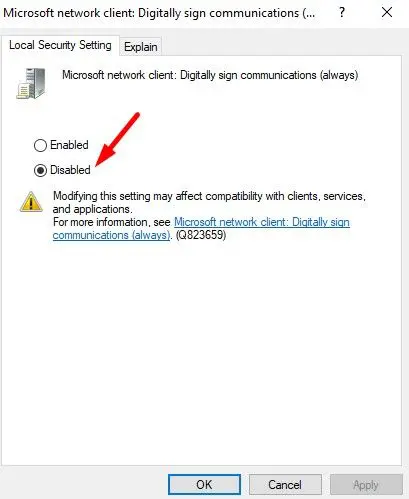
2 – Locate and double click the Disable the Microsoft Network client: Digitally sign communications (always) option.
3 – To turn off this function and preserve your settings, click Disable.
Attempt to share your folder with another computer right now. It should now work.
Disable Antivirus And Firewall Temporarily
As previously stated, a firewall disables your network connection and prevents file sharing. In addition, TA third-party antivirus programs may sometimes bring on the issue. To determine whether the issue has been fixed, try to disable your Windows firewall and antivirus software.
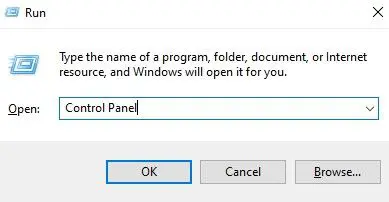
1 – To open the Run tool, use Windows + R on your keyboard.
2 – To open the Control Panel window, type control panel.
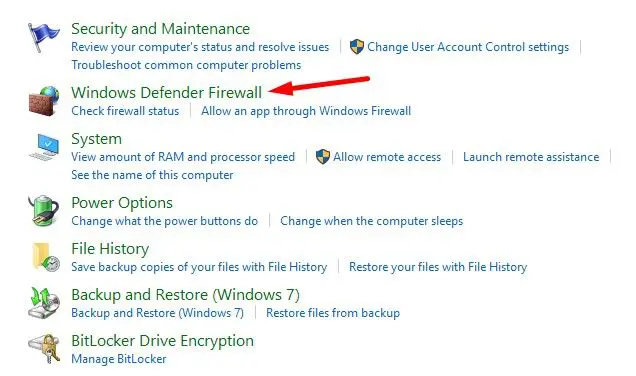
3 – Click System and Security.

4 – Click Windows Defender Firewall to proceed.
5 – Select the “Turn Windows Defender Firewall on or off” option from the left pane.
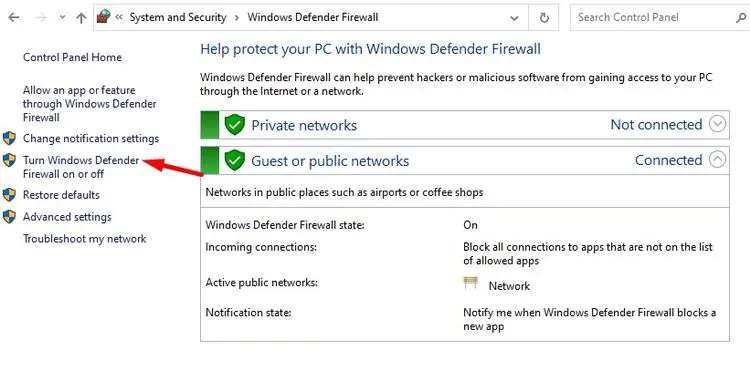
6 – Select the “Turn off Windows Defender Firewall” option for private and public networks.

7 – Click OK to preserve your settings and restart your computer. These steps will solve the issue if your firewall causes it.
Reinstall Network Adapters
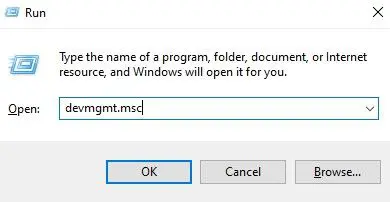
1 – To open the device manager settings, use the Run command tool and type “devmgmt.msc.”
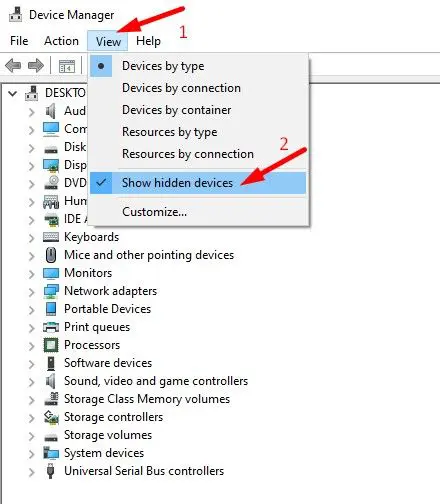
2 – Choose Show hidden devices by clicking on the View tab.
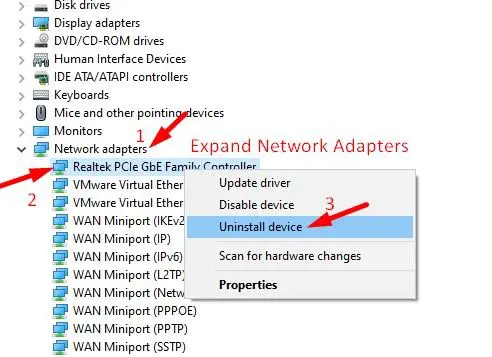
3 – Locate and extend a network adapter.
4 – Right-click on the network driver and select Uninstall. This procedure will delete your system’s network adapter.
5 – After restarting your computer, your system will immediately detect the network adapter.
Enable NetBIOS Over TCP/IP
Microsoft used NetBIOS (Network Basic Input/Output System) for peer-to-peer network interactions. NetBIOS uses broadcasting to identify network computers and allows them to connect for file sharing. To enable NetBIOS, do the following steps.
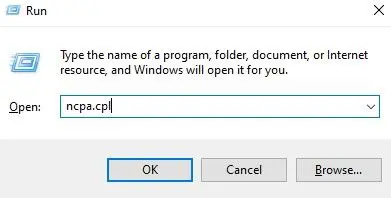
1 – Press Win + R to open the run tool, then enter “ncpa.cpl” into the command prompt. Then, on your keyboard, hit enter to execute the command. Open network connections using this command.
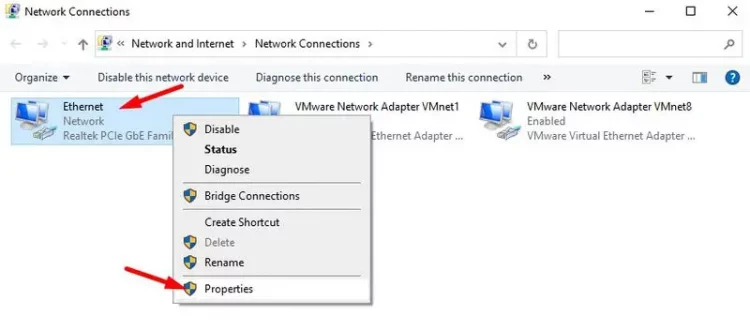
2 – Check all your connected networks, including WiFi, here.
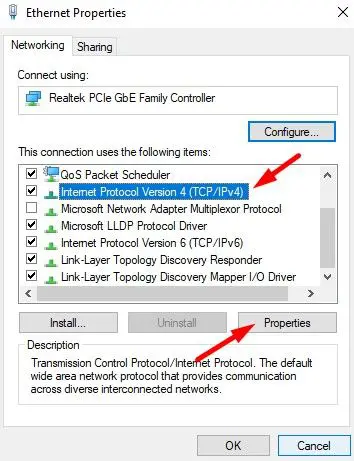
3 – If connected to a WiFi network, right-click it and select Properties. If you are connected by Ethernet cable, right-click Ethernet and select Properties.
4 – To access properties, choose and open Internet Protocol Version 4 by double-clicking on it.
5 – Next, click the Advanced option and then the WINS tab.
6 – Click “Enable NetBIOS via TCP/IP” in the NetBIOS settings.
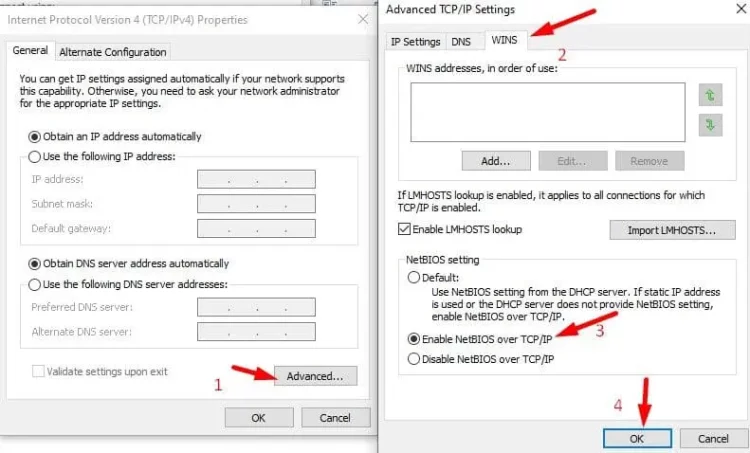
7 – To save the settings, click OK.
The Bottom Line:
This article helped you fix error code 0x80070035, and you may share your file with another computer. Not all of the solutions must be followed by you. To fix the issue, follow the solutions. Leave your thoughts in the comment section.


