One of the most common errors seen by ASUS customers is “AAsIO3.sys,” which may alternatively be shown as “can’t open AsIO3.sys error code 433.” Some users may find the error normal, while others may find the scenario horrifying when the whole computer screen becomes blue. This error also occurs when the computer is turned on.
The “AsIO3.sys” error may be caused by various factors, including invasive malware, a damaged hard drive, obsolete or malfunctioning device drivers, corruption issues inside the system memory, or issues in the Windows Registry. So, how do you resolve this PC issue? The primary question arises: If you are experiencing problems fixing this error, this article will likely be able to help you fix it and offer you a few viable fixes.
How To Fix AsIO3.sys Error On Windows 11 And 10 PC?
Unfortunately, there is a chance that you may lose data throughout the restoration procedure. Hence, we recommend backing up your crucial data before employing these procedures. Then, when you’ve made a backup, you may start working on the solutions.
Update System Device Drivers
Several people discovered that updating their system drivers to the most recent version solved their issue. For that, follow the steps below.
1 – Press Win + R on your keyboard to open the Run dialogue.
2 – After typing devmgmt.Msc into the search box, and press Enter.
3 – Check for drivers with a yellow exclamation mark in the Device Manager window.
4 – Choose the Update Driver option by right-clicking on the driver with a yellow exclamation mark.
5 – Select Search automatically for updated driver software in the pop-up box.
After updating the system device drives, check whether the “AsIO3.sys” error is fixed.
Uninstall Recently Installed Apps
Most consumers said that installing a new computer program caused the AsIO3.sys error to emerge. Uninstalling any newly installed PC apps is a possible solution you may attempt.
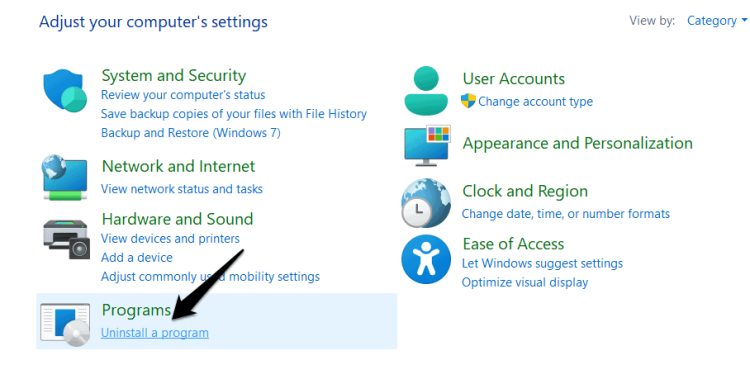
1 – Open the Control Panel on your PC.
2 – Click “Programs.”
3 – Choose the “Programs and Features” option.
4 – Choose the program or programs that you just installed.
5 – Left-click on them to open the context menu.
6 – Select “Uninstall” from the list of available options.
7 – Restart your computer to ensure proper app uninstallation.
If you no longer see the “AsIO3.sys” error, the issue may have been caused by your most recent app installs. If the problem isn’t solved, there are various alternative solutions you may attempt.
Fix Windows Registry Items
Issues with the Windows registry may bring on the AsIO3.sys error. As a result, before resolving this system error, you must resolve any registry issues using the built-in Automatic Repair of Windows tool. Try this troubleshooting by following the steps below.
1 – Press the Win + I button to open the Settings panel.
2 – Select Update & Security from the main menu.
3 – Click the “Recovery” option.
4 – Select the Restart Now button under the Advanced Startup section of Recovery.
5 – After a brief delay, a blue window will emerge with different options. Again, it would be best if you chose the Troubleshoot option.
6 – Choose the Automatic Repair/Startup Repair option under Advanced options.
7 – After switching to automatic mode, you will be requested to input the recovery key to restart regular functioning. After that, click “Continue.”
When you have completed all of the steps above, Automatic Repair will start a diagnosis of your computer, which may need a restart. In this technique, broken registry keys may be fixed.
Run Full Scan To Get Rid Of Malware
A malware attack may cause your AsIO3.sys error. As a result, you may check the system for malware by scanning it thoroughly. These are the actions you must perform.
1 – To open Settings, press Win + I.
2 – Select the Privacy & Security option.
3 – Click Windows Security.
4 – Select the Virus & threat protection option.
5 – From the Windows Defender Security Center menu, select “Scan now.”
The Windows Defender Security Center will now begin scanning the system for threats. When the scan is complete, you can view the findings. Select the Clean system to eliminate any threats found by the scan.
Use Command Prompt
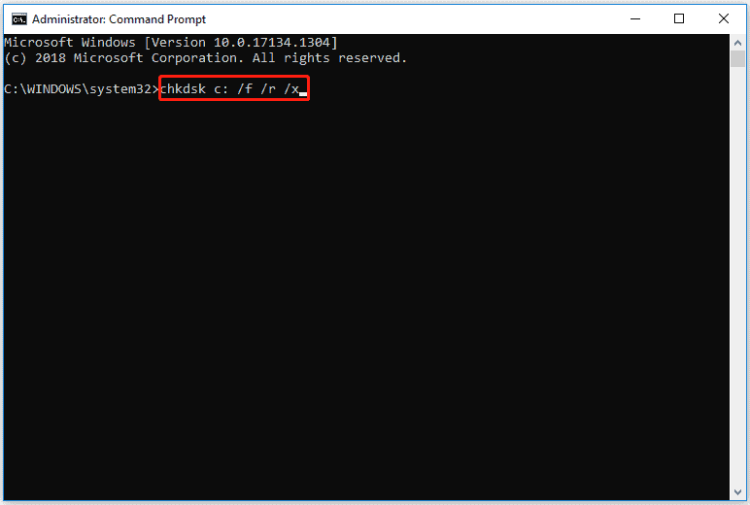
You may also encounter the AsIO3.sys error as a result of hard disk corruption. Microsoft has a Check Disk Utility to detect and fix issues with corrupt hard disks. How to use it is described in the following.
1 – Launch “Command Prompt” as an administrator on your computer.
2 – On the command line, type “chkdsk” and press Enter.
3 – The check disk will detect any corruption issues as soon as it begins and fix them right away.
Keep Windows Updated
There’s a strong chance that your AsIO3.sys error will be fixed after you update your Windows since ASUS engineers are continually working on fixing the files linked to the AsIO3.sys error. To update your Windows, you must perform the steps listed below.
1 – Click on the Windows icon or the “Start” button.
2 – Go to Settings.
3 – Navigate to Security and Updates.
4 – Check for updates and install any required ones immediately.
This may help you fix the AsIO3.sys error on your PC.
Check RAM For Corruption Issues
The “AsIO3.sys” error might be caused by memory corruption. Your PC’s memory may be faulty if you regularly reboot, encounter crashes, hear beeps on startup, or have AsIO3.sys difficulties. You may resolve this problem by using Memory Diagnostic to find and rectify Memory issues on your computer. To check the RAM, please follow the steps below.
1 – Type memory diagnostic into the Windows search box.
2 – Double-click the Windows Memory Diagnostic option that best suits your requirements.
3 – Select Restart to check for issues.
4 – After restarting, your PC will check your memory, and the computer will start automatically after the diagnostic operation is complete.
You must perform the following steps to view the diagnostic report in Event Viewer.
1 – Open Event Viewer.
2 – Navigate to the Windows Logs folder.
3 – Choose a System.
4 – Select Filter Current Log from the right-hand box.
5 – Select MemoryDiagnostics-Results from the Event Sources box and press the OK button to view a record of all memory test results.
6 – Double-click on the most recent result logs to establish if the diagnosis was successful.
If the diagnosis is incorrect, follow the diagnostic’s suggestions for action.
The Bottom Line:
AsIO3.sys errors may be irritating! It might become a barrier, stopping you from completing your project and other activities if you were seeking to fix the AsIO3.sys error on your computer; here are your probable fixes. We hope you found this information informative. If there is anything else you want to add that we haven’t previously addressed, please do so in the comments area to benefit the other readers. Finally, we’d be pleased to assist you if you have any queries concerning the guide.


