After Windows 10, the operating system had several faults and weaknesses. Incompatibility issues are probable if you upgrade to a newer version of Windows 10 without first updating your drivers. This occurred to users who attempted to install the Windows 10 Creators Update. They said that since a procedure of 0xC1900101 errors prevented them from doing so, they did not complete Windows 10.
The error code 0xC1900101 is commonly seen after the BSOD. BSOD stands for “Blue Screen of Death” for unfamiliar people. The system is generally the first to notice the issue. This error is frequently presented with a message that informs you what caused the BSOD or error to appear on your screen unexpectedly! When the Windows 10 fails to install an update, the error computer appears.
0xC1900101 Errors: Reasons And Types
Several users who attempted to update to Windows 10 stated that they were unable to complete the upgrade step due to a succession of 0xC1900101 errors. To summarise, there are various 0xC1900101 errors that are specific to driver issues. These errors have been linked to a faulty, damaged, or outdated driver, which is why you are experiencing problems. There may be times when these issues will impede your progress; therefore, they must be resolved. This error has various variations, which we will list below.
- 0xC1900101 – 0x2000c
- 0xC1900101 – 0x20004
- 0xC1900101 – 0x20017
- 0xC1900101 – 0x40017
- 0xC1900101 – 0x30018
- 0xC1900101 – 0x3000d
- 0xC1900101 – 0x4000d
The issues you encountered are rather typical, and many other Windows 10 users may have had them as well, so there is no need to be concerned. Furthermore, this is not a personal error; with some clever hand tactics and careful execution of the steps, you may return to gaming or working.
0xC1900101 Error Code In Windows 10? How To Fix
“How can I fix errors like 0xc1900101 on Windows 10?” you may wonder. If you’re looking for the correct solution, you’ve come to the perfect location. We will assist you in repairing the error code ‘We were unable to install or upgrade Windows 10-0xc1900101.’ We’ve prepared some options for you. However, make sure you work your way down the list before identifying the one that is a good match for you. We will show you these methods are basic hacks that only need a little computer knowledge. The following are many methods for resolving the 0xC1900101 Windows update or driver errors in Windows 10.
Disconnect All External Devices
A problem with Windows 10 installation error 0xC1900101 is often caused by several peripheral devices connected to your machine. Examples are microphones, portable cameras, scanners, and many more items. When the operating system tries to select drivers for both of them, it becomes stuck. External app drivers, on the other hand, are often incompatible with the operating system.
As a result, we strongly advise you to disconnect any non-essential external devices in order to address this problem. After that, restart the machine to ensure that the 0xC1900101 error remains. This simple method has previously worked for many Windows 10 users. Though it may not be very successful, if it does not work for you, go on to the next phase of work as we continue additional ways to resolve Windows 10 0xc1900101 errors.
Run SFC Scan
The majority of the time, the c1900101 error arises because you have corrupted or destroyed machine data. Fortunately, Windows has a mechanism meant to address issues like these. To fix the issue, use the System File Checker to run a search (SFC). The measurements have arrived.
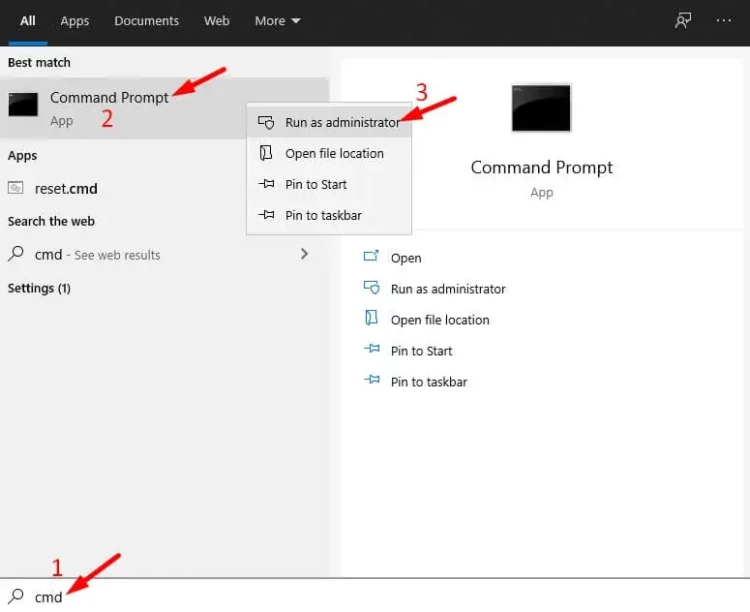
1 – Press Windows Key+S on your keyboard.
2 – Type “cmd” into the Search box.
3 – From the results, right-click on Command Prompt and Choose Run as Administrator.
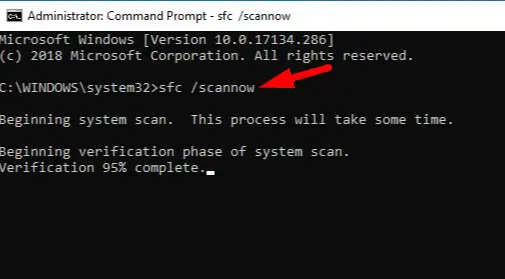
4 – When Command Prompt appears, type “sfc/ scannow” (no quotes) and press Enter.
5 – Remember that the scanning procedure often takes a few minutes. So take care not to interfere with it.
Install the operating system again till the procedure is finished. If the error persists, we propose you use the DISM (Deployment Image Service and Management) utility for Microsoft Windows as an alternate step to patch missing or damaged device images. To proceed, follow the steps below.
1 – Navigate to your taskbar and click the Search icon.
2 – Open a command prompt and type “cmd.exe” (no quotes).
3 – From the results, right-click Command Prompt and then Choose Run as Administrator from the context menu.
4 – Make that you want to run the app (click YES).
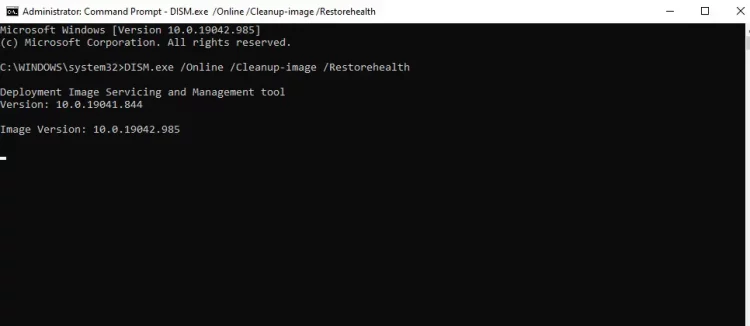
5 – Run the command line below from the Command Prompt.
“DISM.exe /Online /Cleanup-image /Restorehealth”
This would repair the damaged images on your system during the Windows 10 update. However, if the error persists, proceed to the next method.
Remove Third-Party Securities
Antivirus and security solutions are also referred to as the computer device’s savior since they try to protect it against ransomware and security breaches. However, when it seems to make some high-level modifications in the Windows upgrade, it becomes rogue and susceptible. In this case, certain programs, such as Windows Defender, must be deactivated. However, you should keep them away from your computer until the modifications’ difficulties are resolved. Here’s a step-by-step tutorial on how to accomplish it.
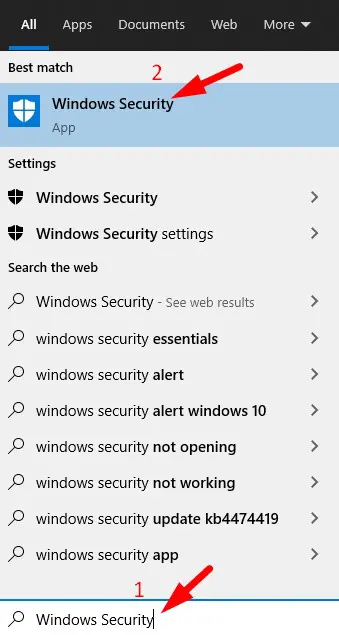
1 – Go to the Windows Start menu.
2 – In the search type, enter Windows Security.
3 – On the keyboard, press Enter.
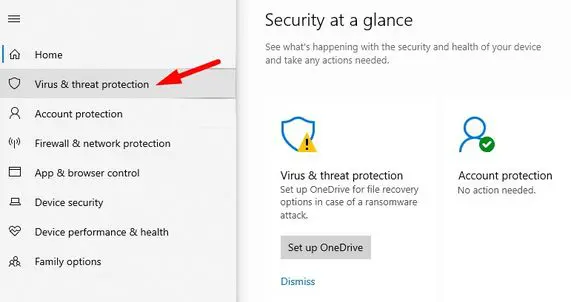
4 – On the left action bar, click Virus & threat protection.
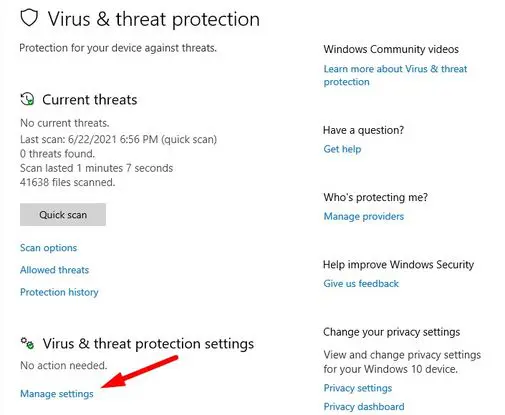
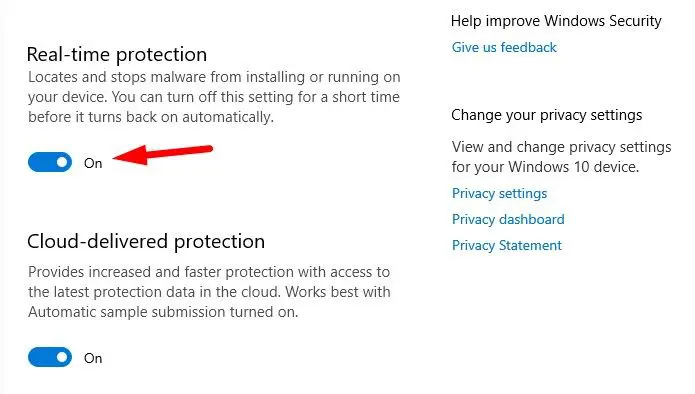
5 – Scroll down to the Virus & Threat Protection Settings section and click Manage settings.
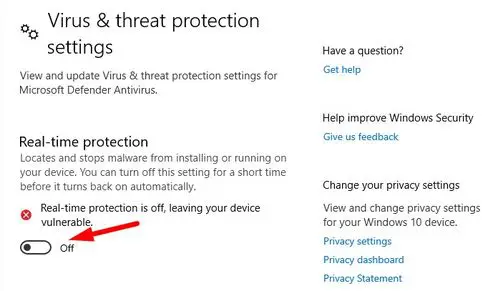
6 – Click the toggle button under Real-time protection to temporarily turn Windows Defender Antivirus.
7 – If asked, click Yes to confirm the change.
8 – Verify that the 0xC1900101 error has been resolved.
9 – To turn on Windows Defender Antivirus, click the toggle button once more.
10 – If you do not manually turn in real-time protection, it will continue at the next computer restart.
Aside from Windows Defender, you may also deactivate third-party antivirus programs to fix the issue. It works well to fix the 0xc0000142 error, frequently caused by a few apps that cannot start properly.
Run Disk Checking Utility Through Command Prompt
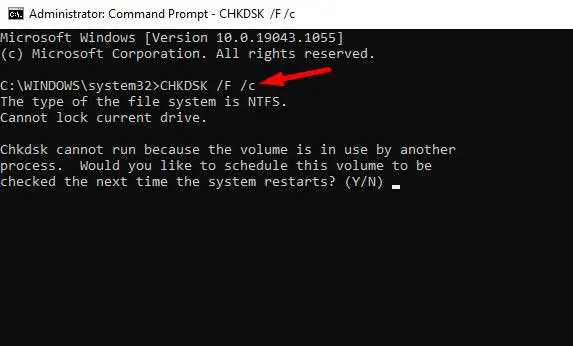
Many times, an issue with Windows is caused by a hard drive failure. This failure might be one of the reasons for the error appearing unexpectedly on your screen. In this case, you must launch an elevated command prompt and run the “run chkdsk” command line. This run may be extremely beneficial in eliminating this issue and any other issues that may have been developed on the hard disk that may or may not have come to your notice. This is how you complete the task.
1 – Click the start button and type “cmd” into the search box.
2 – Select “Command Prompt” from the drop-down menu and right-click on it.
3 – Select “Run as administrator” from the context menu.
4 – If UAC appears on the screen, select “Yes.”
5 – In the Command Prompt window, type the following command: chkdsk C: /f /r /x
- C – This is the disk where the operating system is installed. Depending on your needs, you may change this to D:, E:, or any other letter.
- f – Indicates that the scanned bugs have been fixed.
- r – Denotes finding existing disk issues.
- x – Denotes dividing up the disk volume to aid in detection.
6 – Next, hit the “Enter” key to launch the Disk Checking Utility scanning for faulty sectors.
7 – Do not push any keys and wait for the scan to finish since it will take some time.
8 – When the scan is complete, restart your device so that the modifications are recorded and applied to the computer.
Fix The BIOS Of Computer
Another option for dealing with this issue is to upgrade your BIOS. According to customers, if your BIOS has expired, you may be unable to get a certain upgrade. Several users said that upgrading the BIOS resolved the issue, so you may want to give it a go. However, upgrading your BIOS is a potentially dangerous operation that might ruin your computer. We recommend you consult your motherboard’s documentation for precise instructions on upgrading your BIOS correctly. As previously said, this is an extremely dangerous method, and we recommend that you use it only as a last choice or when you are convinced that this is the problem and that you follow the process step by step.
Use Windows Device Manager
Microsoft recommends keeping all device drivers up to current at all times. This will come in helpful for third-party gadgets that are installed on your Windows. It is either the network driver or the graphics driver on your device. If you cannot find a Windows update, you must search the OEM website and update it. Then, follow the steps below to upgrade it.
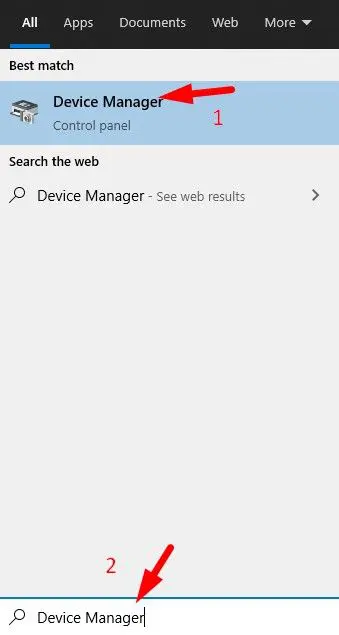
1 – Right-click the start button and select “Device Manager” from the list.
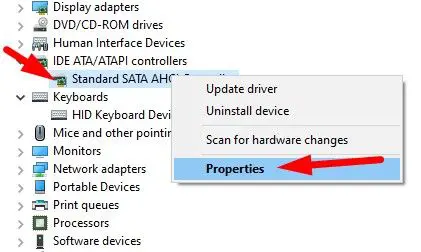
2 – In Device Manager, go to the malfunctioning driver or requires changes and updates. To make things easier, there is a yellow exclamation symbol beside the driver to help you recognize it.
3 – From the available disk for drivers, expand the ones you want and check for any changes or upgrades.
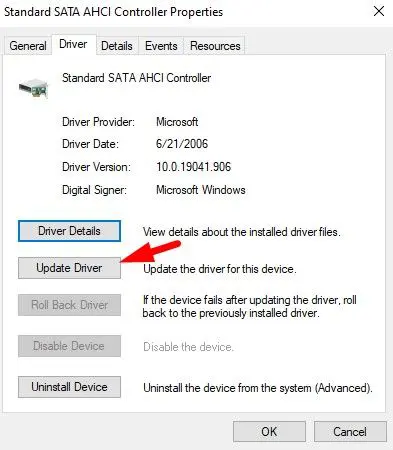
4 – Once you’ve located the driver, right-click on it and select Properties.
5 – In the wizard, go to the Driver tab and then follow the Update Driver option.
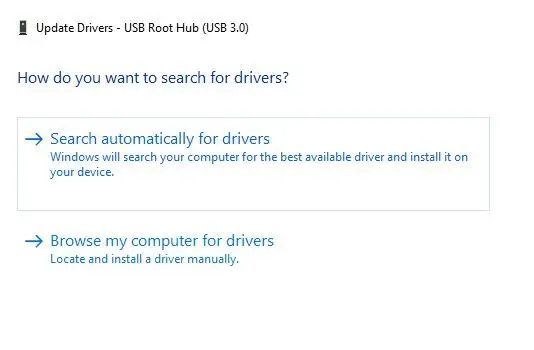
6 – On the following screen, click “Automatically search for updated driver software.”
7 – Once chosen, Windows will download and install the most recent updates available.
8 – After completing the preceding steps, restart your device to see whether the 0xC1900101 error remains.
Check Required Space For Windows Update
Remember that you must have at least 16 GB of disk space on your computer to install Windows 10 Creators Upgrade. You must meet this minimal criterion to avoid getting many 0xC1900101 errors. As a result, we suggest you clear up space on your hard drive to resolve the issue and properly install the upgrade.
There are many options for recovering any megabytes of disk space on your hard drive. The handpicking method is the most prevalent since you can see what is being eliminated and have control over it. The second option is to format a certain area or drive to make some memory; however, this may result in losing some crucial files or documents. Finally, if you’re concerned about losing vital files, try the Disk Cleaning tool to remove undesirable rubbish files from your computer. This is how you do it.
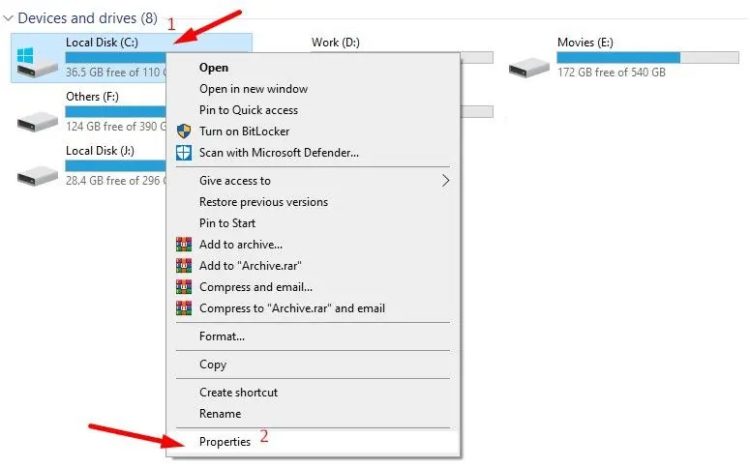
1 – Launch File Explorer by using the Windows Key+E keyboard shortcut.
2 – Right-click the drive you wish to wipe, then select Properties from the context menu.
3 – When the Properties box appears, click the Disk Cleanup option. The utility will start calculating how much space you may reclaim.
4 – Select all the junk files you wish to remove, then click OK.
5 – To remove superfluous system files, click the ‘Clean up system files’ option and proceed with your consent by clicking Yes.
You may also deactivate Hibernation mode to free up additional space on your hard disk. It’s important to know that when you enter Hibernation mode, your device saves the contents of your RAM memory to your hard disk. That ensures that when you restart or reboot, you may continue from where you left off, but in this case, since you need space, the Hibernation mode tends to take up a lot of it, so we suggest that you deactivate it.
Conclusion:
Well, the 0xC1900101 Windows update or driver errors are annoying small, usually harmless errors. However, they often appear at inconvenient times and impede your progress. As a result, you should attempt the methods described above and follow the steps. Continue to attempt the methods one by one until your issue is resolved. The methods outlined are safe and simple to implement.
Please begin restarting your computer to check whether the issue has been resolved. It is a stupid trick to have up your sleeves, not a solution. This obnoxious 0xC1900101 error is bound to cause issues with the driver, so make sure your driver or laptop is free of external or physical damage, as this will only hamper progress. None of the methods will treat physical or hardware damage; thus, we suggest you seek professional assistance. In the comments section below, let us know which workarounds worked for you and eradicate the 0xC1900101 Windows 10 update or upgrade error.
