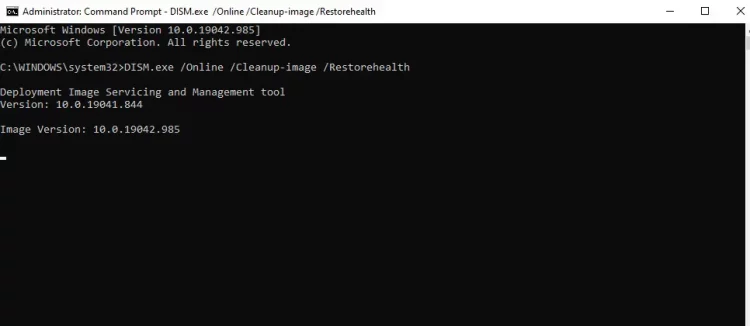
Well, the Deployment Image Servicing and Management (DISM) is a command-line tool developed by Microsoft that allows you to mount Windows image (.wim) files or virtual hard disks. The DISM tool may also be used to manage and split.wim files. When running the DISM /Online /Cleanup-Image /RestoreHealth command in Windows 10, some users face the DISM error 0x800f081f. The DISM command is used to install and configure Windows packages, drivers, and settings.
This command is for repairing Windows images. To fix online Windows update images, use the RestoreHealth DISM tutorial. This command is causing issues for some users. The major reason for this error is that DISM cannot find the necessary files to rebuild the Windows image. In addition, your component store may get corrupted sometimes, or your system may be unable to connect to Update servers. The installation of the .NET Framework might also cause this error. In this post, we will discuss how to fix the DISM Error Code 0x800f081f.
DISM Error 0x800f081f Causes
1 – Corrupted Windows Update files.
2 – Incorrect configuration.
3 – Malware attack.
4 – Poor Internet connection.
DISM 0x800f081f Error In Windows 10? How To Fix
To fix this problem, use an official Windows image file (install.wim) containing legitimate Windows files.
Perform A Component Cleanup
As previously stated, this error might result from missing Windows components. To clean the Windows image and fix the issue, use the DISM cleaning method.
1 – Go to the start menu and type cmd into the search box. Then, on Command Prompt, right-click and choose Run as administrator.
2 – Enter the following command after typing it.
DISM.exe /online /Cleanup-Image /StartComponentCleanup
sfc /scannow
3 – When the operation is finished, run this command and hit enter.
DISM /Online /Cleanup-Image /RestoreHealth
You’ll see that the command runs perfectly without any errors.
Getting Source From Windows Image
The primary reason for the error is that your Windows cannot connect to Windows update servers. To run the DISM command, you must provide the location to a Windows image file. This error will also face if the Windows installation files are corrupted.
1 – Go to the start menu and type cmd into the search box. Then, in the Command Prompt, right-click and select Run as Administrator.
2 – Well, in the command prompt window, type and hit enter the following command.
Note: Replace X with the disk that contains and mounts your Windows 10 ISO.
DISM /Online /Cleanup-Image /RestoreHealth /source:WIM:X:\Sources\Install.wim:1 /LimitAccess
3 – Wait for the command to complete its execution. When finished, it will fix your error.
Upgrading Windows
Upgrading your complete Windows operating system resolves the issue by reinstalling the entire Windows core with the most recent image. This would undoubtedly fix the 0x800f081f DISM error.
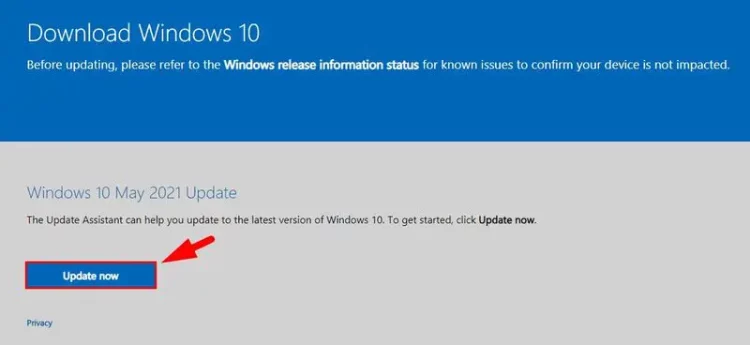
1 – You may upgrade your Windows operating system via the Windows 10 update assistance. First, download and install Windows 10 Update Assistant on your computer.
2 – Now, open Update Assistant and click Upgrade PC. The tool will begin downloading and installing all pending Windows 10 updates. To finish the upgrade, follow the instructions.
When you’re done, you should have a new copy of Windows. You no longer need to run DISM /Online /Cleanup-Image /RestoreHealth, although you may if you wish to see whether the error has been resolved.
Run Windows Update Troubleshooter Tool
Microsoft has released a new tool called Windows update troubleshooter that helps you to detect and fix several issues connected to Windows updates. The tool will automatically search your system for modifications or missing files and take you through the process of resolving any issues. Follow these steps to use the Windows troubleshooter tool.
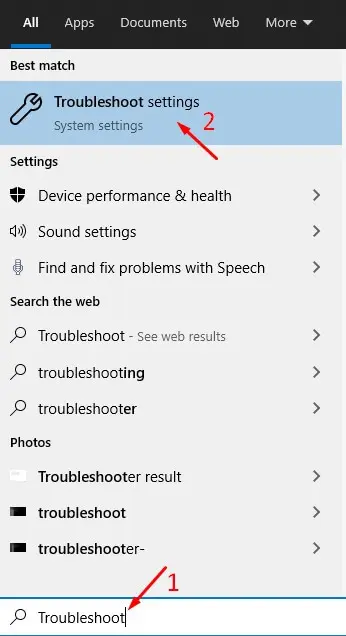
1 – In your Windows search box, type “troubleshooting” and press enter.
2 – Launch the troubleshoot settings from the results.
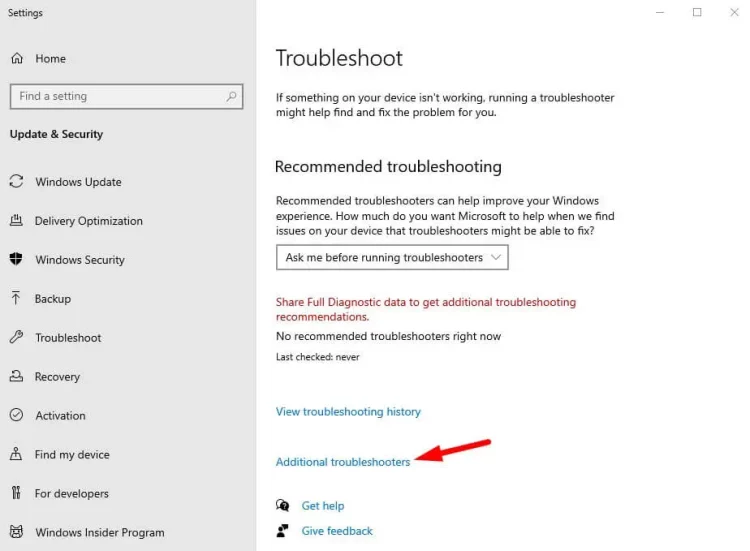
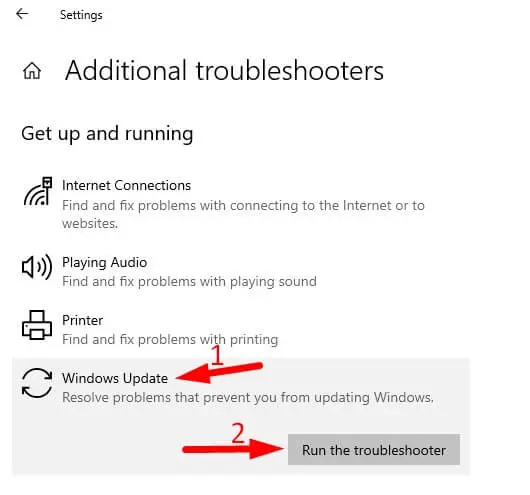
3 – Click the “Additional Troubleshooters” button in the troubleshooting area. This will launch all available troubleshooters to fix different issues on Windows 10.
4 – Click the “Windows Update” button in the Getup and running section. Then click “Run the troubleshooter” once again.
5 – When you click Run the troubleshooter, it will detect the issue. Please wait a few moments for it to start. Then, it will start scanning for any pending restarts and missing files.
6 – When finished, it will provide directions on how to fix the issue. All you have to do now is follow these steps and restart your computer.
7 – Go to Windows Update under Settings and click Check for updates. It should now work.
Configure Windows Update Settings
This DISM source file could not be located error might be caused by incorrect Windows update settings. As a result, you must fix your incorrect Windows update settings. The steps for configuring Windows update settings are as follows.
1 – Press the Windows key on your keyboard to open the Start menu.
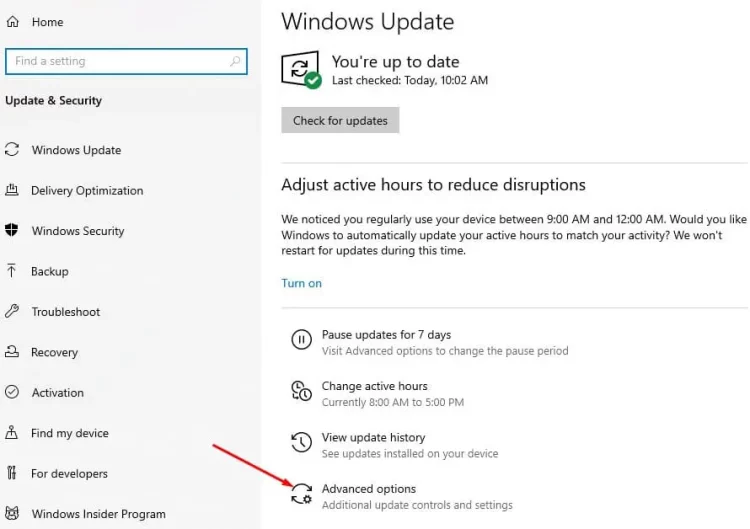
2 – Locate “Windows update settings” and click it.
3 – Next, choose Advanced Options.
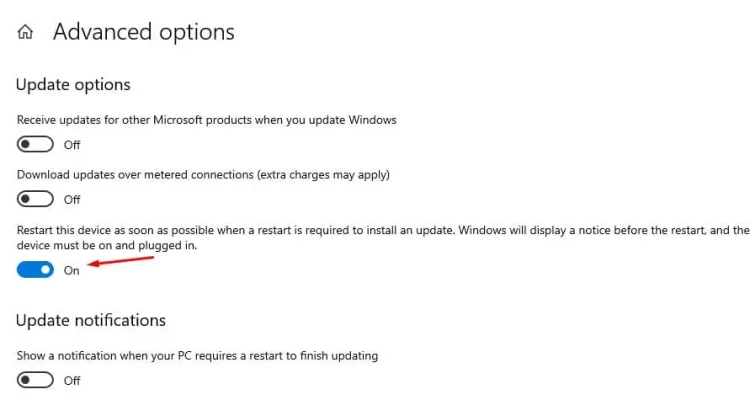
4 – Enable the “Restart the device after update” option.
When you install Windows Update for the first time, you will be given the option to restart your computer. Even if your computer exhibits no symptoms of error, you should always use the “restart” button. This confirms that the update’s new features have been correctly implemented.
Restart Windows Update Service
Allowing your computer to download updates automatically through the Windows Update service is the easiest approach to prevent having Windows Update. This ensures that Windows only installs updates from the appropriate sources. Using Windows services, you may activate automatic updates. The steps are as follows.
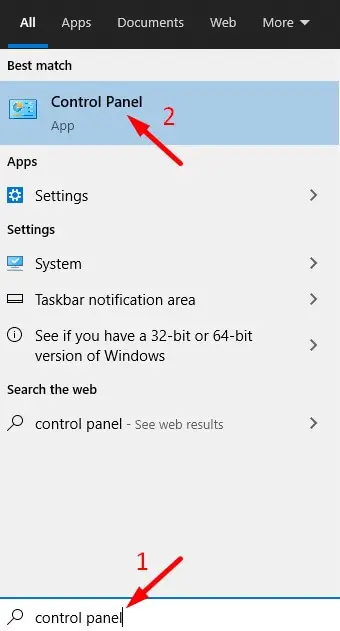
1 – Go to the start menu and look for the control panel.
2 – To open the control panel, click on it.
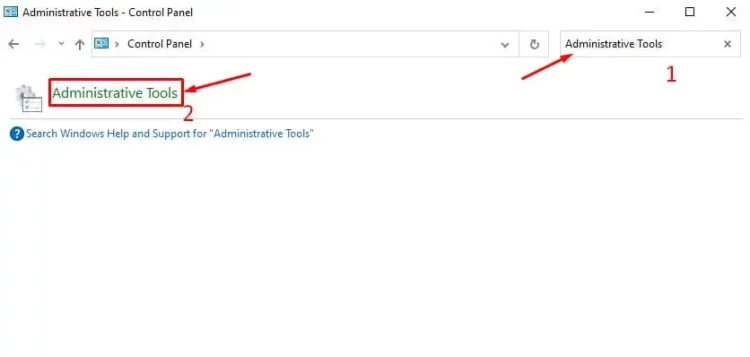
3 – In the control panel, type “Administrative Tools” into the search field.
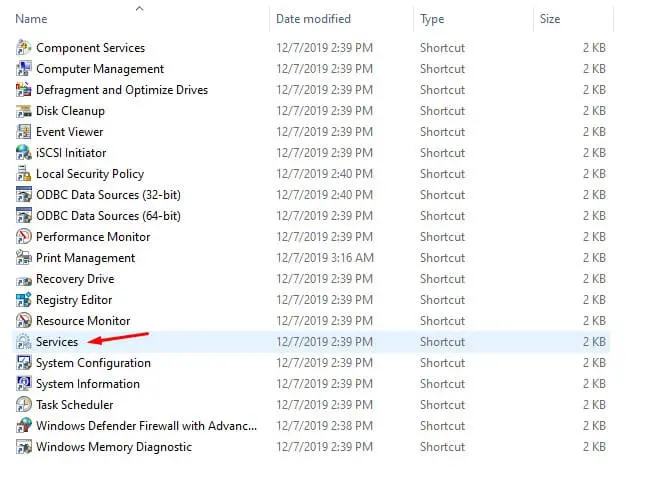
4 – Find and open Services.
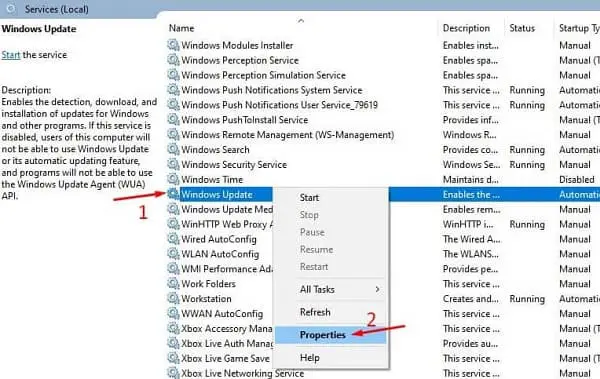
5 – Locate the “Windows Update service” in the list of Windows services.
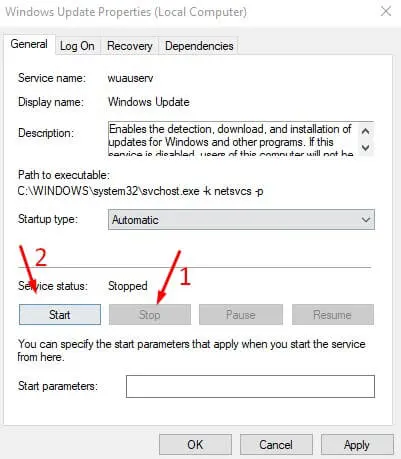
6 – Right-click it and choose Properties. To stop the Windows update service, go to properties and click the Stop option. This will stop your Windows update as well as the services associated with it.
7 – Click the start button once again to restart the update service.
8 – Click Apply to preserve your changes.
Restarting the update service would fix the error 0x800f081f DISM; the source files could not be located in Windows 10.
Reinstall Microsoft .NET Framework 3.5
According to some users, the DISM 0x800f081f error is connected to .NET Framework 3.5, and reinstalling Microsoft .NET Framework 3.5 might fix the issue. So let’s give it a go.
1 – Remove NET Framework files from your computer. To do so, go to the start menu and open Control Panel.
2 – Go to Programs and Features and turn Windows features on or off.
3 – If it is not already chosen, check the box .NET Framework 3.5 (includes .NET 2.0 and 3.0) > Ok.
It will start downloading the latest .NET Framework 3.5 files. When finished, restart your computer, and you’re done.
The Bottom Line:
The 0x800f081f windows update error is very unusual; however, it can readily be fixed without reinstalling Windows. If you have a backup, you may also attempt a system restore. However, it will undo all of your recent system and user modifications. We hope you fixed our remedies and were able to resolve the issue. If you need assistance, please leave a comment below.


